Premiere Pro CC 2017.1: 10 Little Things to Love
Subclip Match Frame, VR Projection, Batch Edit Captions and More "Little" Features in Premiere Pro CC 2017.1
By now you've forgotten the Title Designer ever existed thanks to the new Type tool, Essential Graphics panel, and Motion Graphics Templates in Premiere Pro CC 2017.1. And you're probably overcoming your fear of audio with the therapeutic Essential Sound panel and its enhanced interchange with Adobe Audition. These workflow-changers are deservedly the most talked about features of Premiere Pro CC 2017.1. But there's plenty more "little" things to get excited about! These 10 in particular will give you a deeper appreciation for the innovation of Adobe Premiere Pro CC.
1. Lumetri Color Panel Tonal Controls are adjusted to work with overbrights
If you didn't know about this issue it's probably OK. But for those who were aware, it was a real pain point of color correction in the Lumetri Color panel. Since it's release, the Lumetri Color panel did a poor job handling overbrights - bright whites around 100% IRE and above, especially when it came to pulling them down with the Whites slider. Even with the signal unclamped, the overbrights would get stuck on the 100% line while the rest of the whites got pulled down. This "tearing" (personal term) in the whites resulted in loss of detail and sometimes artifacts. To see the problem explained in detail, visit Limitations in the Lumetri Color Panel by Jarle Leirpoll.
This tutorial is about some limitations and illogical behaviors in the Lumetri Color Panel that you need to be aware of to use it correctly and get the best image quality. —Jarle Leirpoll
The screenshots below compare the same image in Premiere Pro CC 2015.3 (left) and Premiere Pro CC 2017.1 (right) both with the Whites slider lowered -50 in the Lumetri Color panel. The Lumetri Scopes show the trace in the whites getting torn apart in Premiere Pro CC 2015.3, creating artifacts in the image. With the tonal controls adjusted to work properly with overbrights, the Lumetri Scopes in Premiere Pro CC 2017.1 show the whites evenly lowered as one would expect.
2. In and Out Points can be used for partial ingest
You can now perform partial clip ingests in Premiere Pro CC 2017.1. Using the Media Browser in Thumbnail View, you can add in and out points to your clips, and import those specified ranges into your project. The selected portion of the clip is indicated by the blue timeline bar on the bottom of each thumbnail.
Here's the catch: you have to use the Transcode ingest setting. When you perform a partial ingest, it will launch Adobe Media Encoder to transcode the new clip based on your ingest settings. Obviously, make sure the Ingest box is checked in the Media Browser.
Alternatively, you can open a clip from the Media Browser in the Source monitor, set in and out points, and drag the video to your Project panel or create a Subclip (CMD+U) to perform a partial ingest. Both of these methods will trigger Adobe Media Encoder to begin the transcode process.
PRO TIP: The J, K, L shuttle keys work when previewing video thumbnails in the Media Browser.
3. Video previews Adobe Stock
In previous versions of Premiere Pro CC, you had to open Adobe Stock videos in a browser to watch them. Premiere Pro CC 2017.1 now supports Adobe Stock video previews in the Libraries panel. Simply hover scrub the clip thumbnails to preview video search results. At this time, frame-by-frame and shuttle controls are not supported.
Don't forget, you can filter Adobe Stock results to just show videos under the Results from Adobe Stock twirl down.
Speaking of Adobe Stock, Pond5 has announced their Global Partner Program with Adobe Stock integration. Pond5 contributors who opt-in to the program can have their content sold on the Adobe Stock marketplace. According to this Adobe blog post, Creative Cloud users will have access to a "large and growing segment of high-quality footage clips from Pond5’s collection."
Announcing Adobe's Stock's partnership with global video community Pond5. —Adobe
4. Three Axis rotation for VR Workflows
Premiere Pro CC 2017.1 comes with it's own native rotation controls for VR/360° videos. They come as the new video effect: VR Projection. With it you can select your type of VR/360° media and easily adjust the Pan (x-axis), Tilt (y-axis), and Roll (z-axis). The VR Projection effect can be used instead of the Offset effect and other 3rd party plugins previously needed to make rotation adjustments to VR/360° video.
5. New Audio Effects
In a previous post, I highlighted the new Convulution Reverb and DeEsser audio effects in Premiere Pro CC 2017.1. Truth is there's a bunch more audio effects that have been brought over from Audition CC. Here's the full list of new audio effects in Premiere Pro CC 2017.1:
- Convolution Reverb
- DeEsser
- Distortion
- FFT Filter
- Notch Filter
- Scientific Filter
- Hard Limiter
- Mastering
- Pitch Shifter
- Stereo Expander
- Surround Reverb
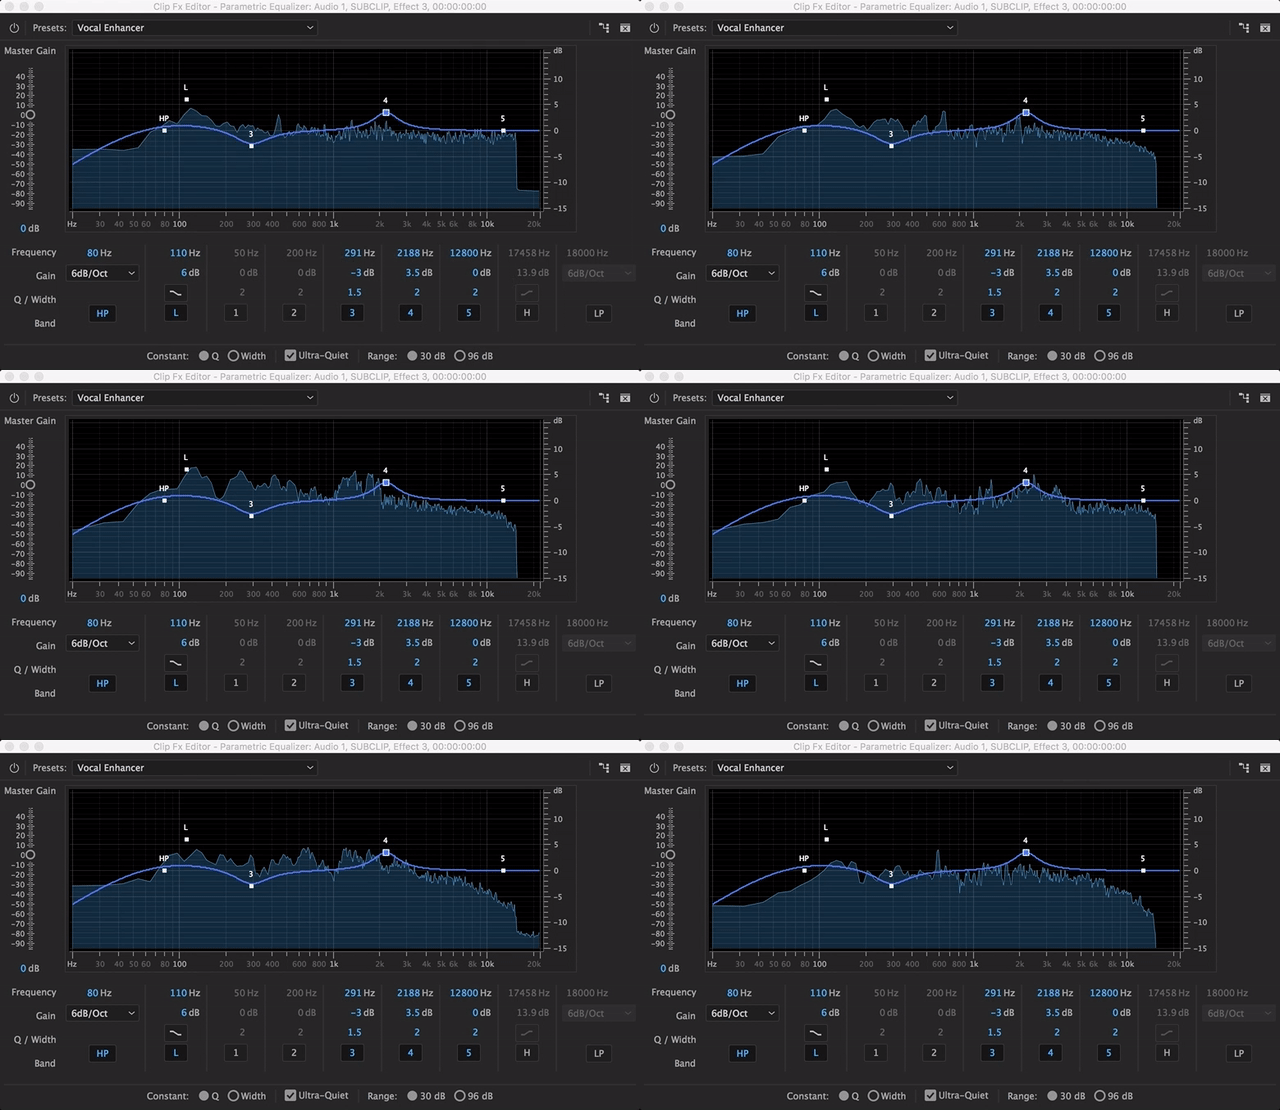
Also, audio effects in Premiere Pro CC 2017.1 now include real-time spectral displays and gain meters. These visual guides give editors instant feedback as they make adjustments to their audio. They also make it easier to identify problem frequencies when using an EQ effect.
The new audio effects are also very futuristic looking. Wouldn't you agree?
Screenshot of Adobe's new features summary
6. Batch edit function for captions
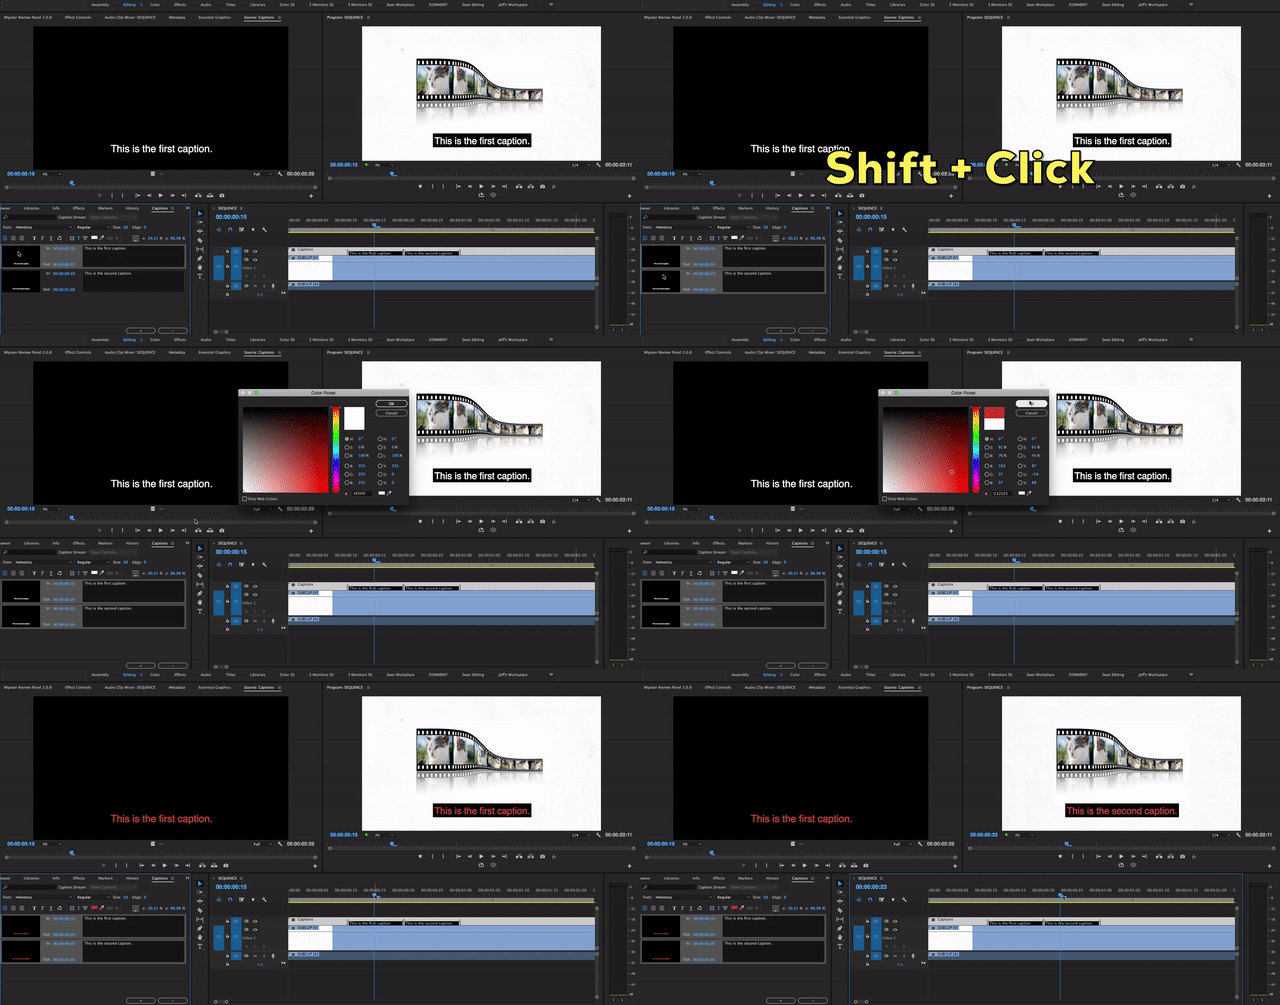
This little feature is going to make editors who use Captions very happy. Previously, you couldn't edit multiple captions within a single captions file. Premiere Pro CC 2017.1 allows you to select multiple captions in the Captions panel and edit things like font, size, background etc. To select multiple captions for batch editing, hold the Shift key as you click them. In the example below you can see I select two captions and change the font color from white to red.
7. MacBook TouchBar support Microsoft Dial support
No pictures for this feature. If Apple and Microsoft send me these devices, I will gladly update the post. For those fortunate to be working with these tools, I sincerely hope you're happy. Here's what Adobe announced about these features:
“New tactile input technologies allow editors enhanced interaction with their work, and Premiere Pro now features native support for Apple Touch Bar. You can also use the new Microsoft Surface Dial for fine adjusting of parameters directly on the Surface Studio.”
8. Media cache expiration policies
This is a feature your hard drive will love. We've all forgotten to clean the Media Cache only to discover it's taking up a good chunk of storage space. Premiere Pro CC 2017.1 has new Media Cache expiration controls located under a dedicated tab under Preferences. Choose from two options that will automatically delete cache files: older than a specific number of days or when the cache folder reaches a specific size, in which case the oldest cache files will be deleted first. Don't worry, Premiere Pro will automatically regenerate deleted cache files if necessary.
Not ready to trust this feature? No problem - switch to "Do not delete cache files automatically."
9. Match frame from subclip
Saved one of the best features for the end. You may not know that you can Match Frame a nested or multi-camera sequence back to the source file by pressing F twice. Well, now you can also do it with Subclips!
Premiere Pro CC 2017.1 lets you create Subclips with the ability to Match Frame back to the original media, even if you Restrict Trims to Subclip Boundaries. It's a little hard to tell, but in the example below I'm pressing Match Frame (F) twice. The first time loads the Subclip in the Source Monitor. The second time loads the source file the Subclip was created from. Note the in and out points that appear on the second Match Frame - those are boundaries of the Subclip.
10. Premiere Pro CC 2017.1 is available NOW!
Adobe has abandoned its pattern of announcing new features several months before publishing them. Premiere Pro CC 2017.1 was available for download the same day it was announced. Is this a new precedent? Time will tell. *Eyes slowly turn to IBC 2017*
What do you think about these "little" features in Premiere Pro CC 2017.1? Do you have one that's not on the list? Please share it in the comments below!


