3 Ways to Freeze Frame in Premiere Pro
How to Add Frame Hold, Insert Frame Hold Segment and Export a Still Frame in Premiere Pro.
The ability to create a freeze frame is an essential skill in video editing. Freeze frames can be used stylistically, like a snapshot effect, or to pause titles and graphics to fit the timing of an edit. Premiere Pro gives video editors several options for creating freeze frames or frame holds as they’re called in Premiere Pro.
In this tutorial, featuring a video by Orange83, you will learn three of the ways to create a frame hold in Premiere Pro. We’ve broken out each of the three ways into their own section for you to watch.
Add Frame Hold
Orange83 starts off with Add Frame Hold. This first way of creating a freeze frame in Premiere Pro will turn the clip into a freeze frame at the position of the playhead.
Place the playhead over the clip where you want to add a freeze frame. Right click the clip and choose Add Frame Hold. This will split the clip and the playhead and the remaining part of the clip will become a freeze frame. Need the freeze frame to be longer or shorter? Click the end of the clip and drag it out as long as you want.
Insert Hold Frame Segment
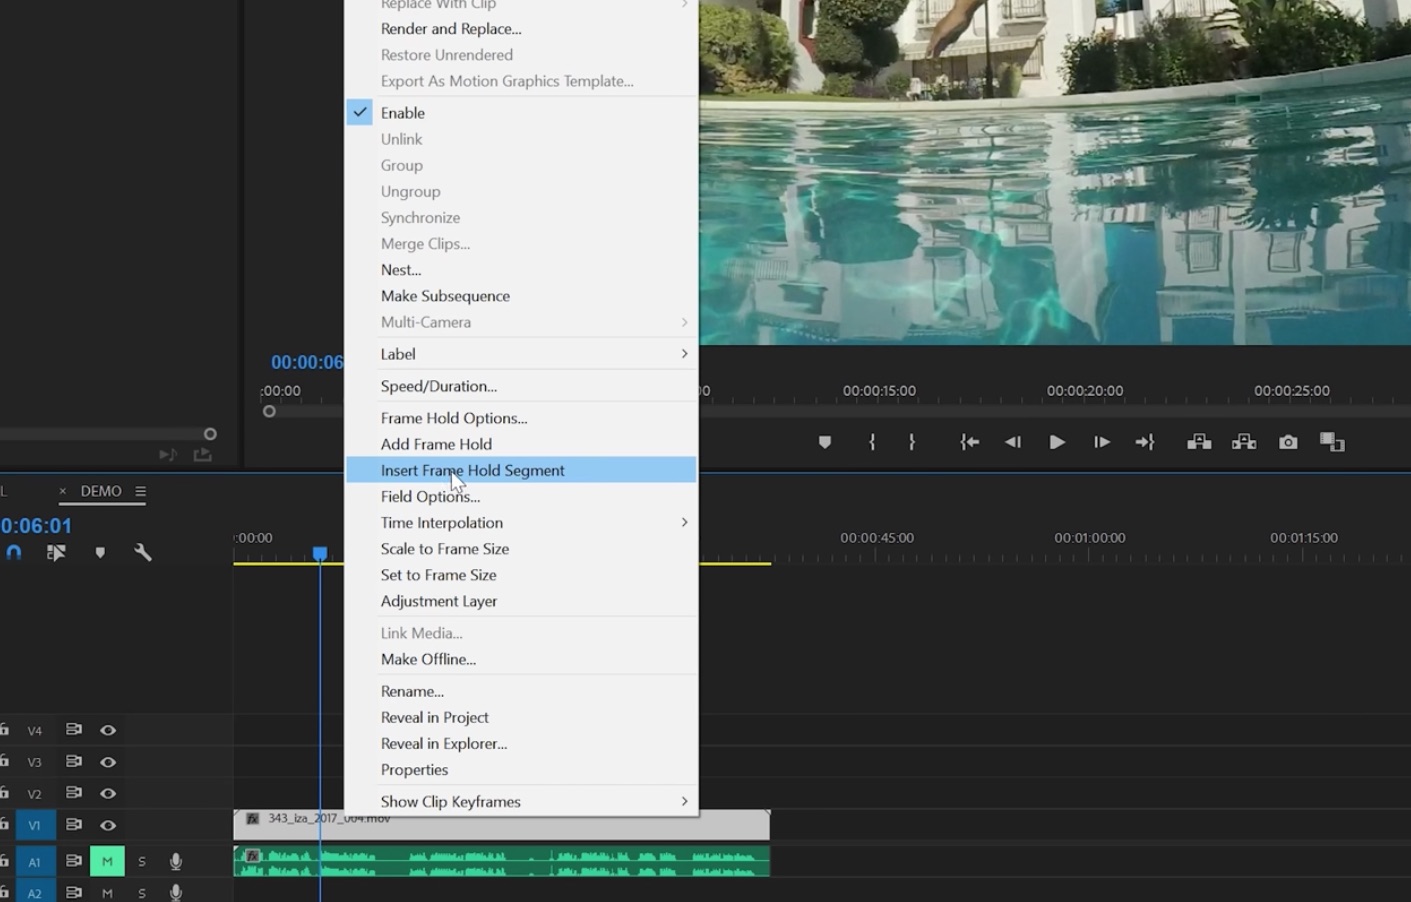
Orange83’s second way to create a freeze frame in Premiere Pro is Insert Hold Frame Segment. This option will automatically split the clip at the playhead and insert a freeze frame. Watch the segment below to see how it’s done.
Same as Frame Hold, place the playhead over the clip where you want the freeze frame to begin. Right click the clip and this time choose Insert Frame Hold Segment. This will split the clip and insert a freeze frame at the spot of the playhead. The length of the freeze frame will be 2 seconds. Note that Insert Fame Hold Segment will split audio clips as well.
Orange83 shares a handy keyboard shortcut to ‘ripple extend’ the length of the freeze frame by clicking the end of the clip while holding the Control key on Windows, Command key on Mac. You will see the ripple edit tool turn yellow when hovering over the edit point, indicating a ripple edit. Use this to to trim or extend the length of your freeze frame.
via Orange83
Export / Import Still Frame as Freeze Frame
In this segment, Orange83 will show you his final way of creating a freeze frame in Premiere Pro. You will learn how to export a still frame from Premiere Pro and automatically import it into your project to use it as a freeze frame.
Move the playhead to the frame in the Timeline you want to export. To export a frame in Premiere Pro, click the camera button in the control bar under the Program monitor.
If you don’t see the camera button, click the plus sign in the control bar to open up the button editor. Drag the camera button to the control bar.
Alternatively, you can use the keyboard shortcut CTRL+SHIFT+E to export a still frame.
From the Export Frame window, choose the format for your frame and check the box Import into Project. This will automatically add the still frame to your Project panel after export.
Now you can insert the still frame as a freeze frame at the playhead position. This can be done by cutting the clip, moving the second part over and dragging the still frame into the gap. Over perform an Insert Edit from the Source monitor.
Bropinion
Creating freeze frames in Premiere Pro can be confusing at first because of the several frame hold options. This video by Orange83 makes them easy to understand by showing what each option does. His third option of exporting a still frame is a valuable skill to know in itself.
Which freeze frame method do you like best? Are there different circumstances you might use one free frame method and not another? Let us know below!
Orange83
Orange83 is the place for high quality Premiere Pro and After Effects tips and tutorials. Visit Orange.com and check out the free presets and templates for Premiere Pro. Show your support by joining the Creative Filmmakers Facebook group and supporting Orange83 on Patreon.


