
Premiere Pro CC 2018 (12.1) Updates and Smart New Features
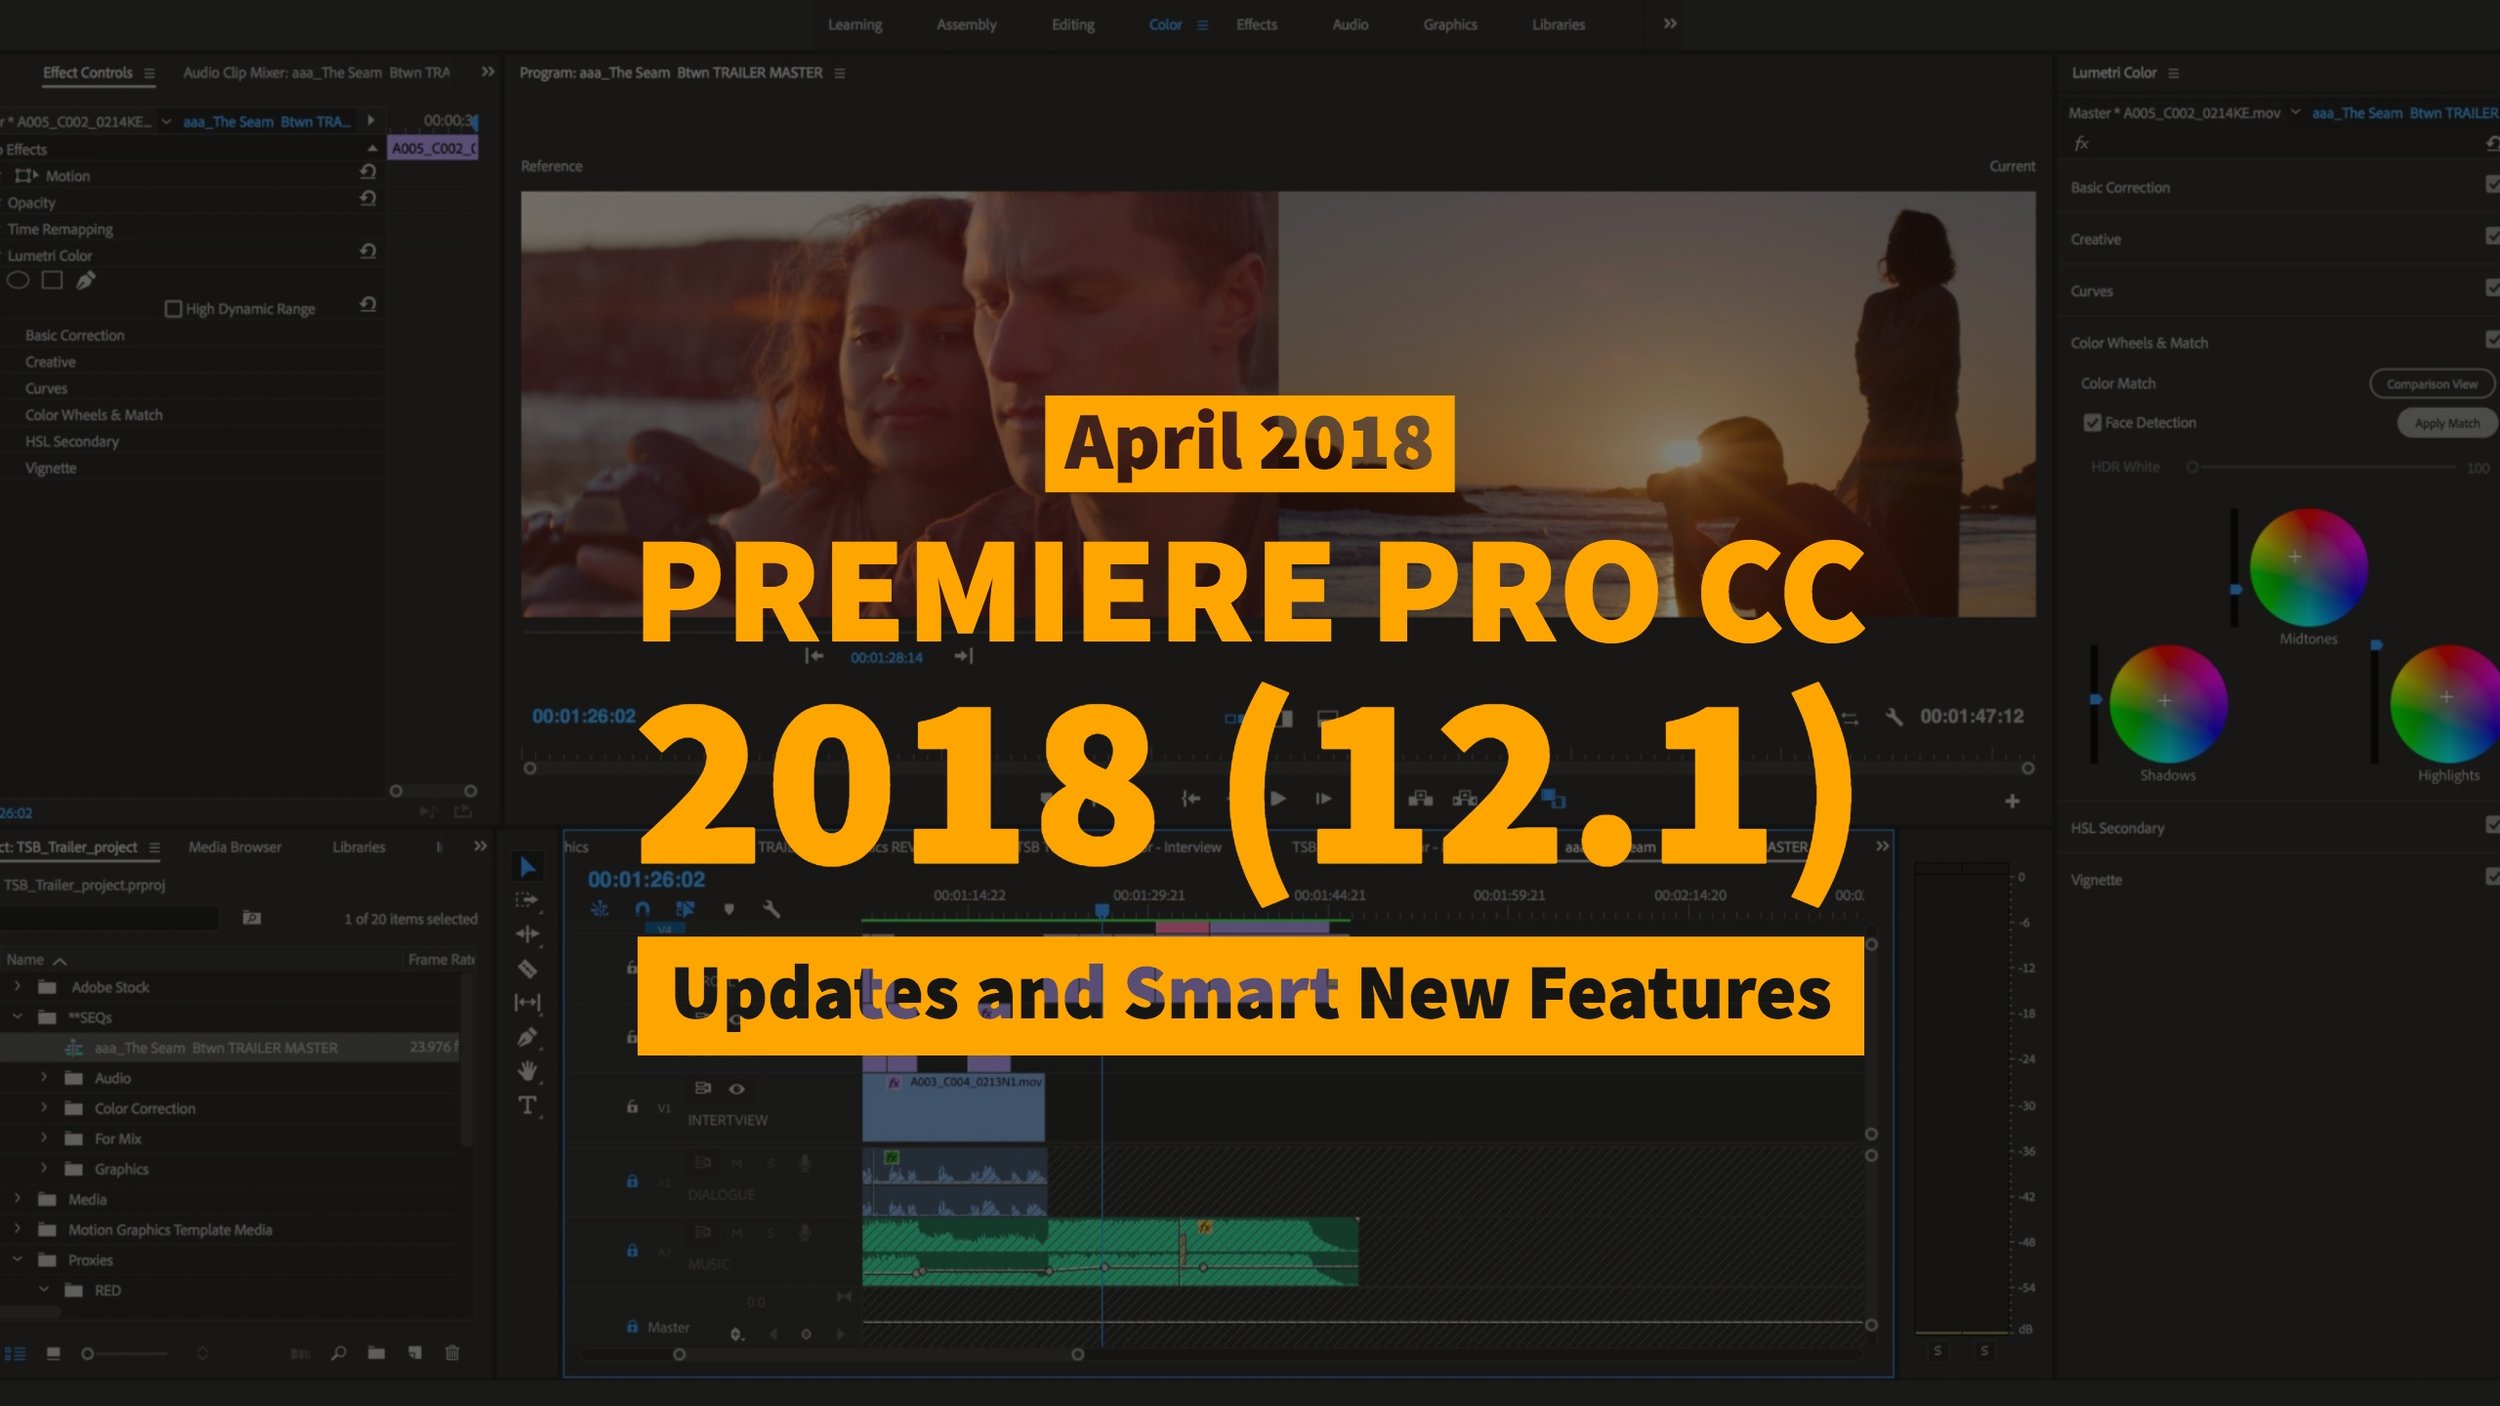
Learn All the Updates in Premiere Pro CC 2018 (12.1), Featuring Intelligent Color Match and Auto-Ducking.
Adobe has released Premiere Pro CC 2018 (12.1), available now for all Creative Cloud subscribers. At the center of the release are new smart color and audio workflows, powered by Adobe's artificial intelligence: Adobe Sensei. Learn how to use the Color Match, Auto-Ducking, and Comparison View in Premiere Pro CC 2018 (12.1). As well as the updated Essential Graphics panel, the new Learning Workspace, User Voice Community, and lots more!
Adobe's NAB 2018 marketing focuses on the combined power of the Creative Cloud video and audio applications. This post only covers the new features specific to Premiere Pro CC, not After Effects CC or Audition CC. For example, we do not cover the new Open Premiere Pro Projects in Audition.
This is a LONG post with a lot of deep insights. Features are not organized by popularity, so make sure you scroll all the way through!
WARNING: Premiere Pro CC 2018 (12.1) is a point update and will overwrite the existing CC 2018 version. It can not be installed side-by-side. You can roll back to the previous version of Premiere Pro CC 2018 (12.0.1) in the Creative Cloud app.
Color Match
Premiere Pro CC 2018 (12.1) introduces Color Match, the first shot matching color tool in the Lumetri Color panel. Color Match leverages the artificial intelligence of Adobe Sensei to analyze a selected Reference frame and make smart color adjustments.

Compare the looks of two different shots across a sequence of shots and match colors while retaining skin tones with a single click. All changes made are visible and accessible to the user and can be manipulated further if necessary.
Color Match is found under the Color Wheels tab, now called "Color Wheels & Match." Using the new Comparison View (more on this later), users can match the overall color of a shot to any frame in the active sequence with a single click. All Color Match adjustments are dialed in with the Color Wheels, where the results can be manually refined. A separate Face Detection option can intelligently adjust for skin tones, making Color Match even more accurate.
Use Color Match in 3 Steps

- Click the Comparison View button in the Color Wheels & Match section of the Lumetri Color panel. This activates the Apply Match button.
- Use the slider under the Reference frame to select the shot in your sequence you want to match to.
- Click Apply Match. Adjust the Color Wheels as needed.
As long as the Reference clip or image is in the active sequence, you can Color Match your clips to anything! Here are two examples of how to get creative with Color Match in your workflow:
- Test stock footage with Color Match before licensing.
- Color Match your clips using stills from your favorite films and music videos.
There's no doubt Color Match will simplify the color workflows for many editors. We want to remind our readers that, while we love the convenience and accuracy of Color Match, it is not a replacement for the knowledge and expertise of a colorist. We encourage our readers to pursue understanding the art of shot matching, and not become handicapped by this wonderful feature.
LEARN MORE: Color Match Shots (Official Adobe help page)
Comparison View (Shot or Frame Comparison)
There is a new Comparison View in the Program monitor in Premiere Pro CC 2018 (12.1). As seen in the Color Match workflow above, it can be enabled directly in the Lumetri Color panel. There is also a new Comparison View button in the default layout of the Program monitor control bar.

Split your program monitor display horizontally, vertically, or view full images side by side to compare an image before and after color grading. Easily turn the active Lumetri Color effect for a selected shot on or off directly from the Lumetri Color panel. Reset all the Lumetri Color panel selections for a shot with a single click.
Shot or Frame Comparison
It's important to note that Comparison View has two modes: shot comparison and frame comparison. Shot comparison will display two different frames and has the Reference frame timecode, Go to Previous/Next Edit controls, and Timeline slider. Frame comparison will show the before/after state of a single frame. You can toggle between them with the aptly named "Shot or Frame Comparison" button. Notice below how the monitor names change from "Reference, Current" to "Before, After."

Side-by-side, Vertical Split, and Horizontal Split
For both shot and frame comparison, there are three different comparison views. In addition to the default Side-by-Side, Comparison View also has Vertical and Horizontal split views.

When in Vertical or Horizontal split view, you can manually adjust the split by dragging on the center line. Clicking away to a different split view and back again will reset it to the center.

Comparison View: More Than Just a Color Tool
Comparison View is worthy of it's own featurette because it can be used for more than just Color Match, or color correction for that matter. It can be used to compare anything in your sequence, like effects or graphics. Basically, if you can think of a visual before and after scenario, Comparison View can show it. Here are just a couple examples:
- Warp Stabilizer
- Shot restoration (denoising, sharpening, etc.)
- Motion Graphic Template changes
- Fonts and text placement
Lumetri Color Scopes Comparison View
Another great thing about Comparison View is the Lumetri Scopes will mimic Comparison View, including side-by-side, vertical, and horizontal split views. Use Lumetri Scopes in combination with Comparison View to achieve precise shot matching.

LEARN MORE: Compare edits to clips in the Program Monitor (Official Adobe help page)
Bypass and Reset Lumetri Color Effects
The Lumetri Color panel now has its own FX bypass button in the top left corner of the panel. It's a feature that makes toggling color grades on and off much easier. Set a custom keyboard shortcut for "Bypass Lumetri Color Effect" so you can quickly do before and after comparisons of your grade.

There's also a new Reset Effect button in the top right corner of the Lumetri Color panel, making it easier to start your grade from scratch, instead of manually reseting the controls.
Lumetri Color Custom LUT Directories
The 12.1 version of Premiere Pro CC 2018 will scan a new directory (folder structure) for custom LUTs and automatically install them in the Lumetri Color panel. Here's the catch: you have to manually add the directory yourself. Simply follow these directions from Adobe:
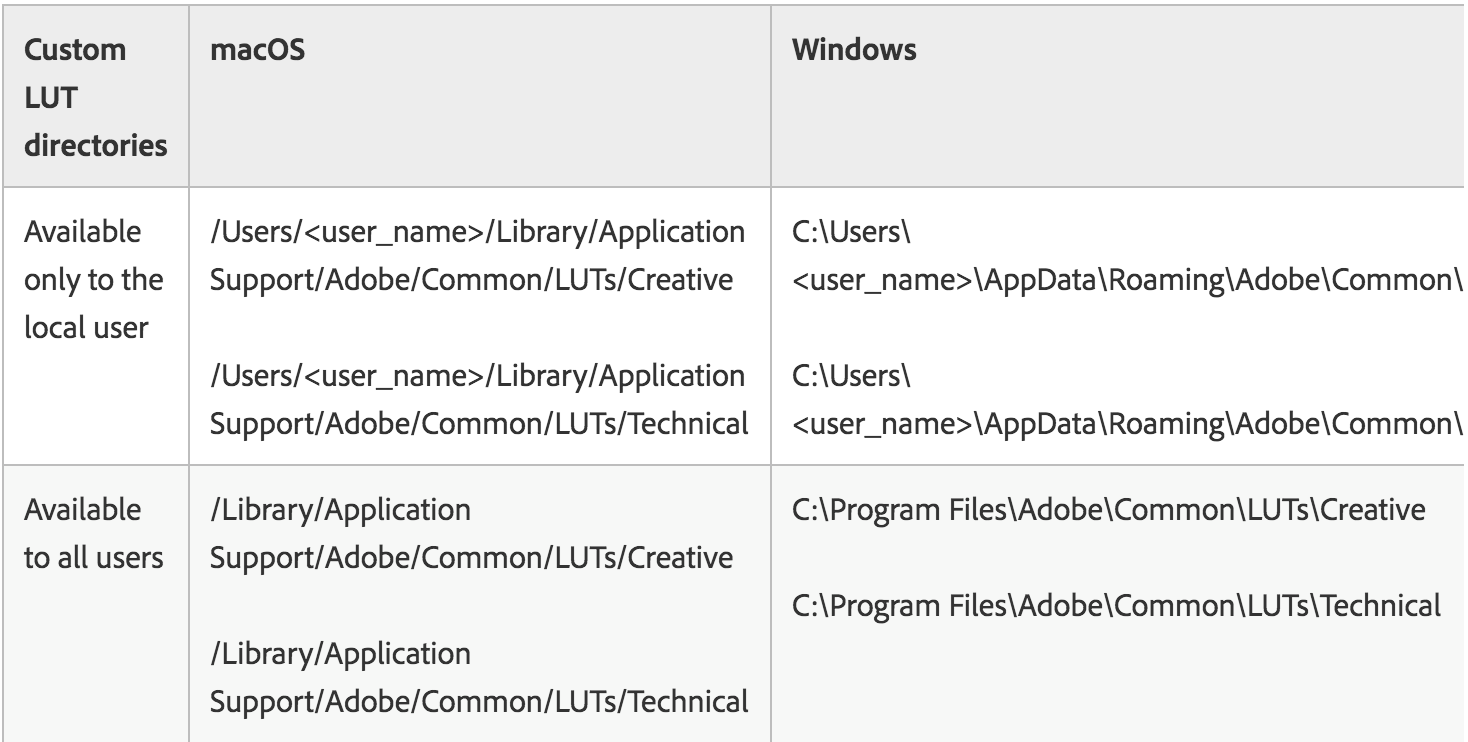
LUTs copied to the "Creative" folder will appear in the Creative tab of the Lumetri Color panel. LUTs copied to the "Technical" folder will appear in the Basic Correction tab.
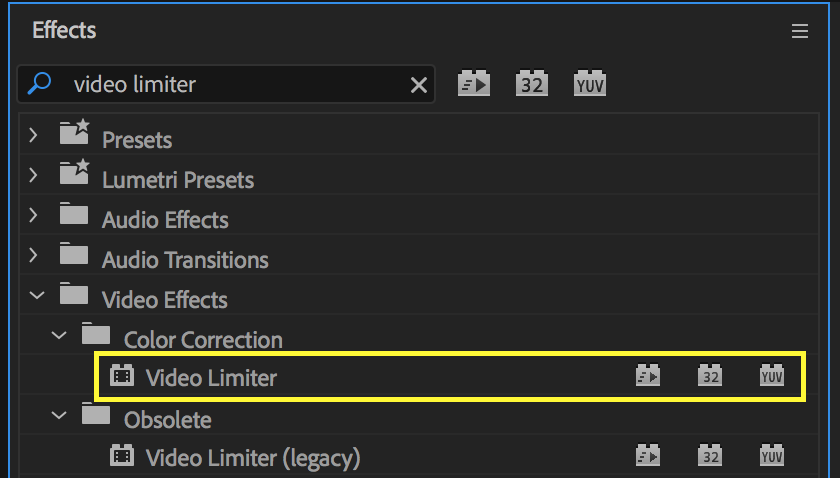
Video Limiter Effect
An updated Video Limiter effect is found under the Color Correction effects. New presets as well as some "under-the-hood image processing" has been added to it. And just to state the obvious, Video Limiter applies to both white and black levels. Apply Video Limiter to a troublesome clip, or to an adjustment layer above the entire sequence. When applying it to specific clips, make sure the Video Limiter is after any color adjustments, otherwise it will give you a false reading.
Select the appropriate legal range for your delivery specifications under the Clip Level drop down. Choose your desired amount of "Compression before clipping": 3%, 5%, 10%, or 20%. This applies a soft knee compression that brings the colors back in range, avoiding a hard clip.
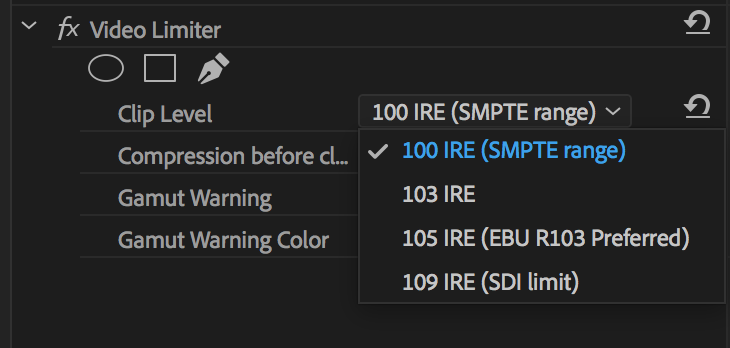
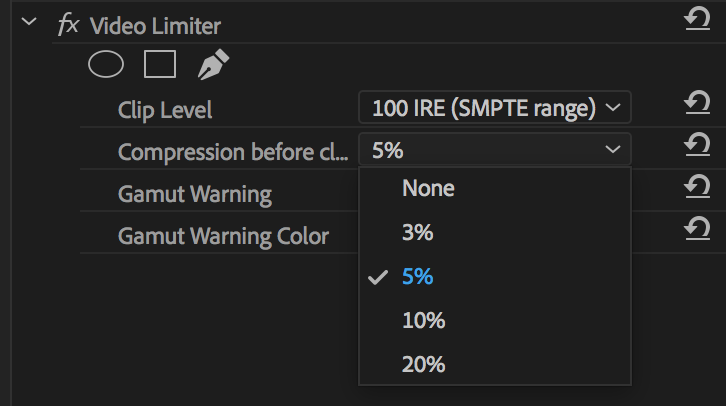
Check the box to enable the Gamut Warning to see specifically where illegal colors and compression is being applied in the frame. You can even customize the color of the Gamut Warning. Because why not!

Video Limiter settings can also be applied to a sequence on export. Under the Effects tab in the Export Settings window, select the appropriate Clip Level for your deliverable and choose your desired "Compression before Clipping." Export with confidence knowing your video will not exceed legal range for your broadcast.

Again, another reminder to our readers that slapping the Video Limiter effect is no substitute for the skill of a colorist. We encourage you to learn the skill of grading your footage and staying within legal range of your delivery requirements.
LEARN MORE: Video Limiter effect (Official Adobe help page)
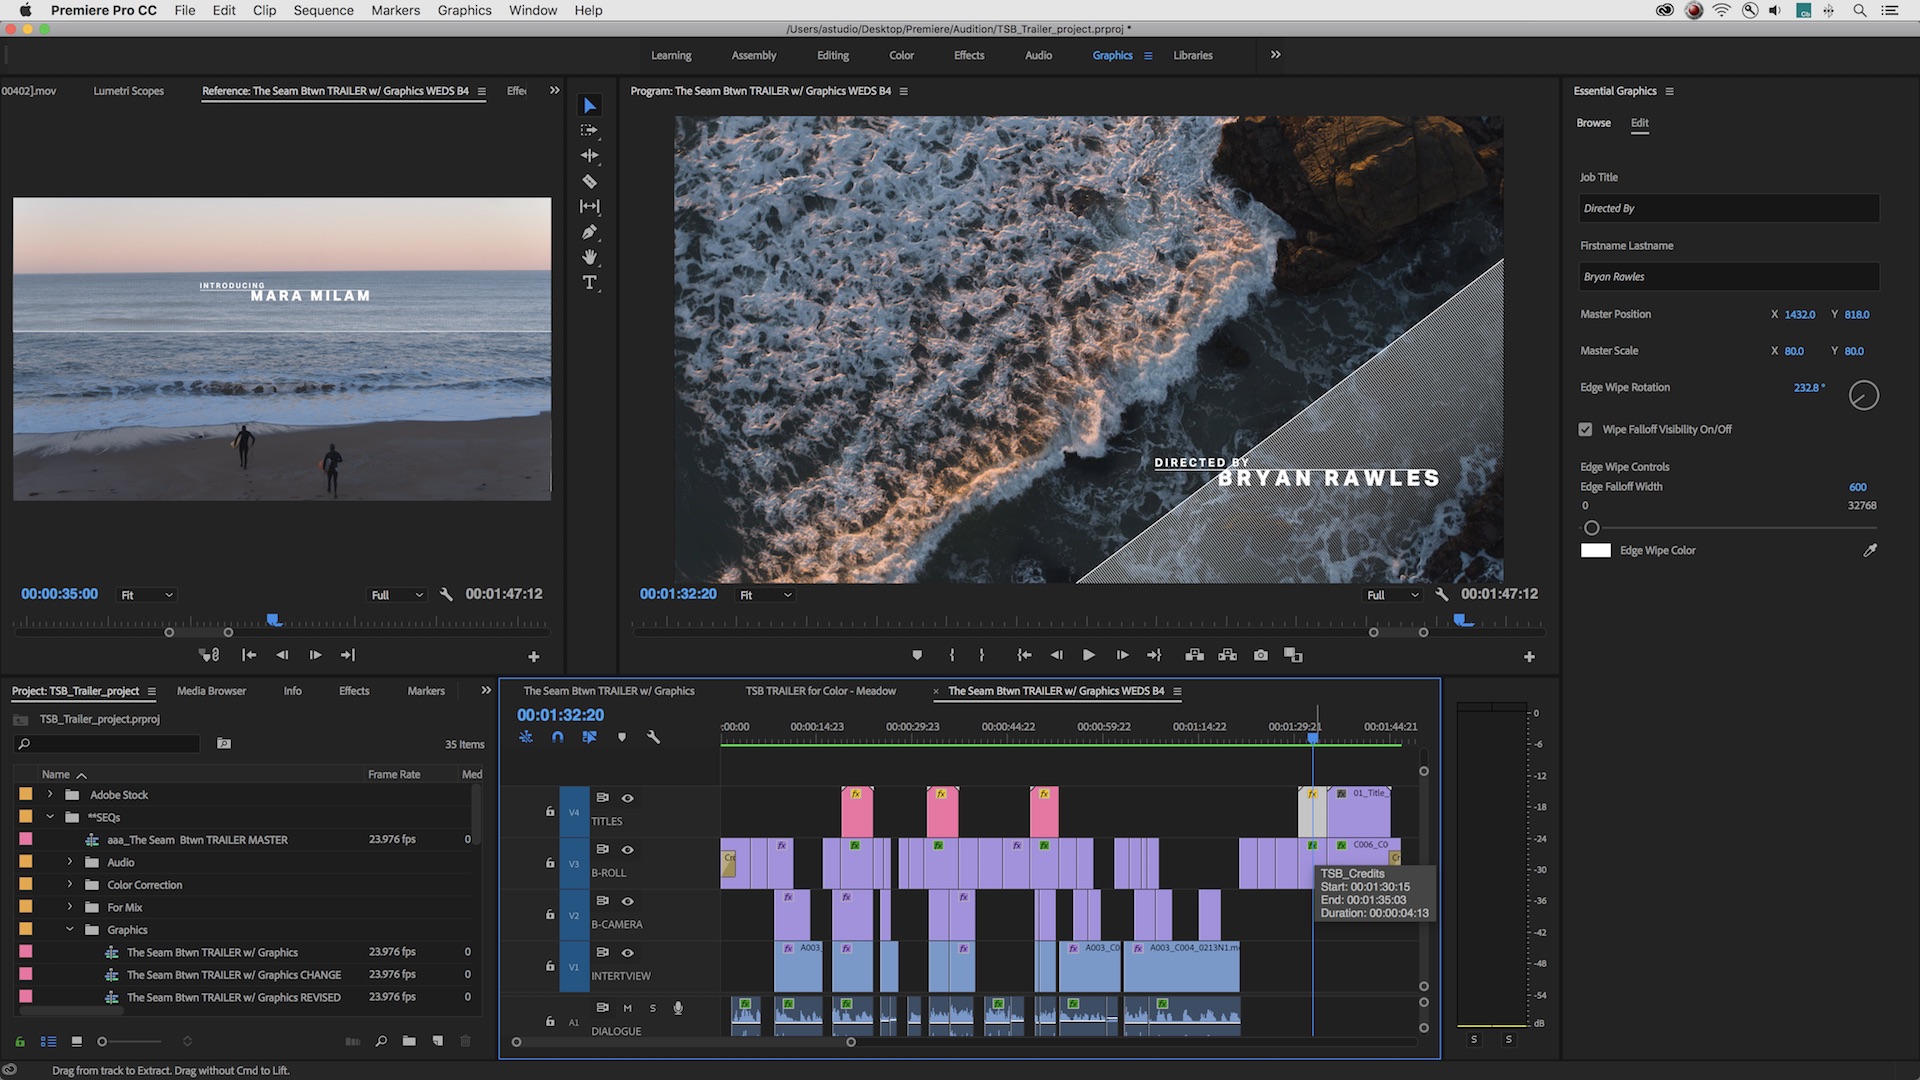
Enhanced Essential Graphics Panel
Toggle Animation in the Essential Graphics Panel
The Position, Anchor Point, Rotation, Scale, and Opacity controls in the Essential Graphics panel can now be clicked to toggle keyframe animation.

Animate more quickly with the ability to toggle on animation for Position, Rotation, Anchor Point, Scale, and Opacity by clicking their icons in the Essential Graphics panel and then adjusting the property in the panel or by editing the graphic layer directly in the Program Monitor.
Animate the text or graphic directly in the Program monitor without having to go into the Effect Controls panel. (Motion keyframes can be manually refined in the Effect Controls panel as they normally would.

LEARN MORE: Animating using the Essential Graphics panel (Official Adobe help page)
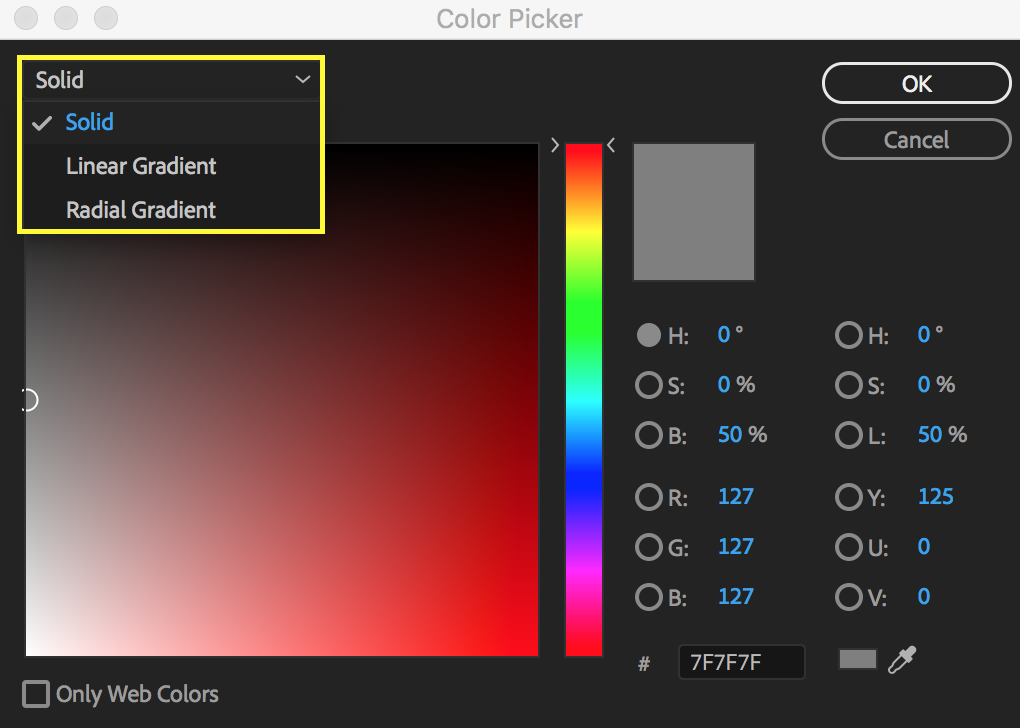
Create Color Gradients in the Essential Graphics Panel
Users can now add color gradients to shape layers directly in the Essential Graphics panel. Click the Fill color to open the Color Picker window, and in the top left drop down menu choose Linear or Radial gradient. Edit the colors, opacity, and midpoints using the sliders in the Color Picker.
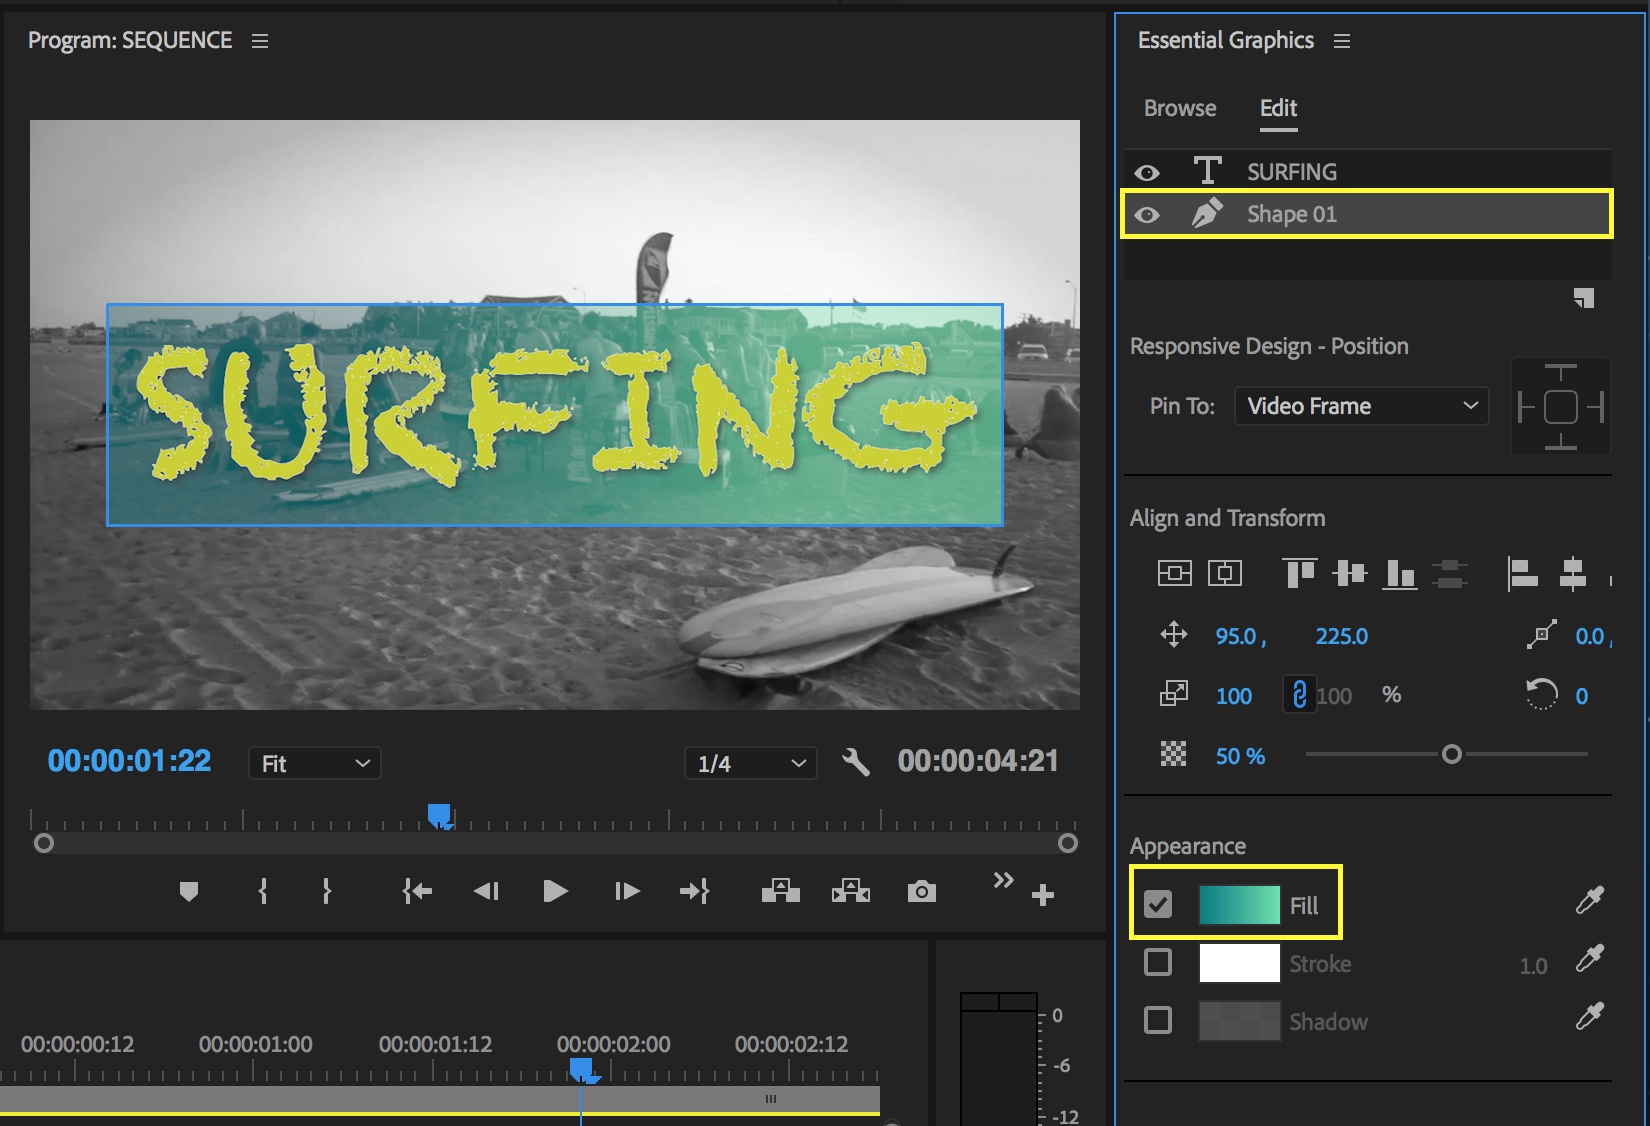
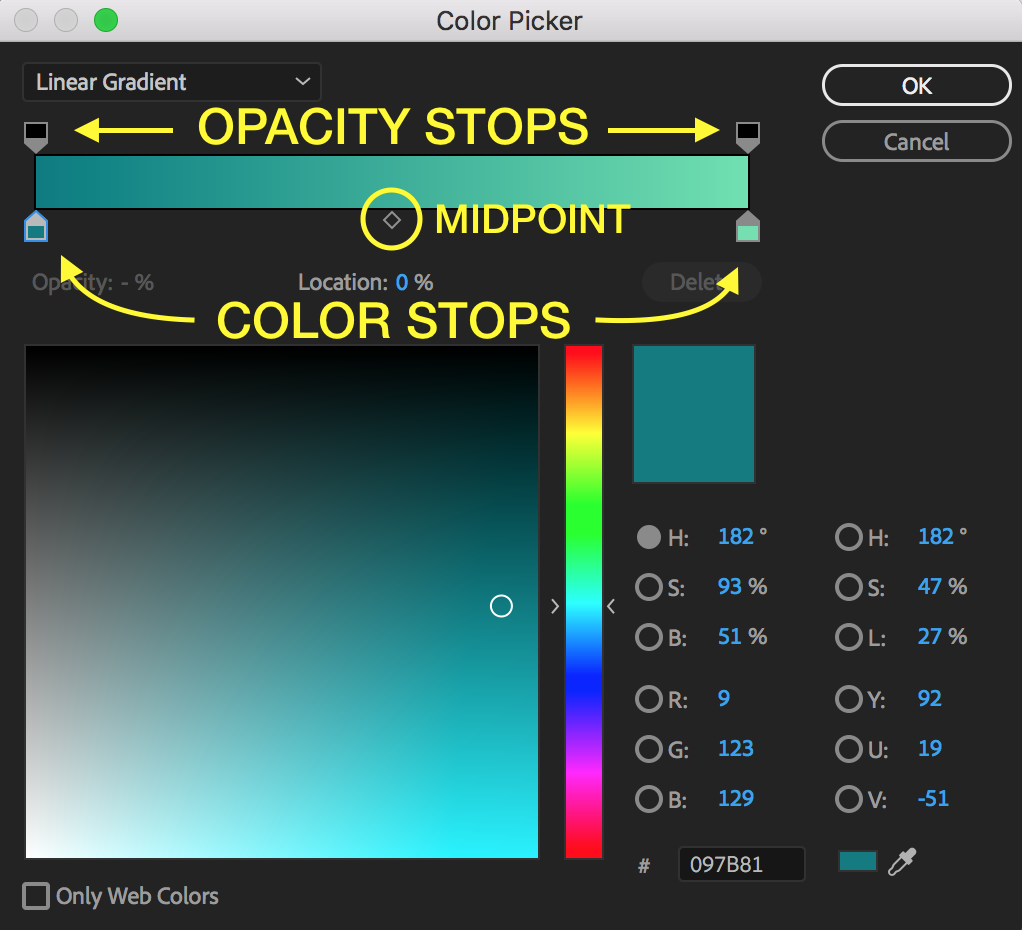
You can also adjust the angle and the color points directly in the Program monitor. Use gradients to give your graphics more color, depth, and even to create faux 3D shapes.

Motion Graphic Templates and Adobe Stock
Improved Motion Graphics Template Interface and New Controls
The redesigned Essential Graphics panel and new controls make it more intuitive to edit Motion Graphics Templates. Premiere Pro CC 2018 12.1 allows users to adjust the 2D position, rotation, and scale of elements.
An improved interface and new controls in the Essential Graphics panel make it easier to customize Motion Graphics templates created in After Effects, including adjusting the 2D position, rotation, and scale of elements. Edit text layers of the graphic by clicking on them in the Program Monitor.
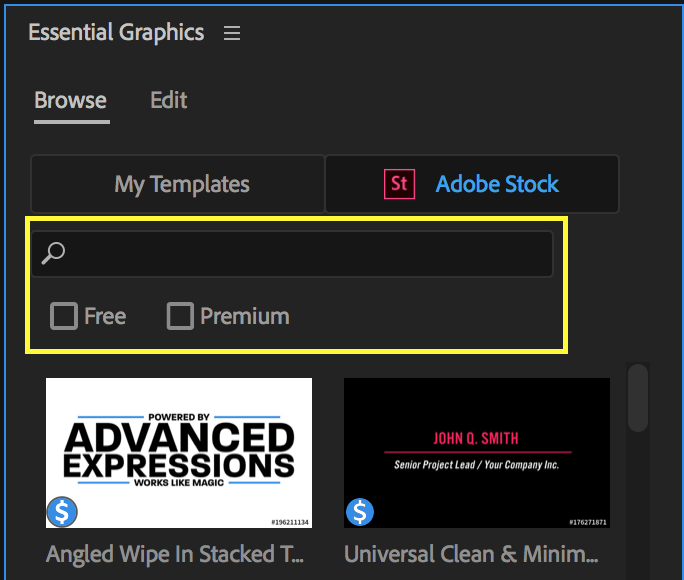
Search and Preview Motion Graphics Templates
A new search bar and search filters make finding .mogrt templates locally, in the cloud, or online easier.

A better browsing and managing experience lets you universally search and preview Motion Graphics templates from your local templates folder, Creative Cloud Libraries, or Adobe Stock right in the Essential Graphics panel to quickly find the template you need.
Search My Templates for templates installed in the local Motion Graphic Templates directory and/or saved to Creative Cloud Libraries. Click Adobe Stock to browse high-quality Motion Graphics Templates that can be licensed directly in the Essential Graphics panel. You can choose to filter Adobe Stock results by Free or Premium templates.

In both My Templates and Adobe Stock, support for hover scrubbing makes it easier for users to preview templates and quickly find the right one for their project.
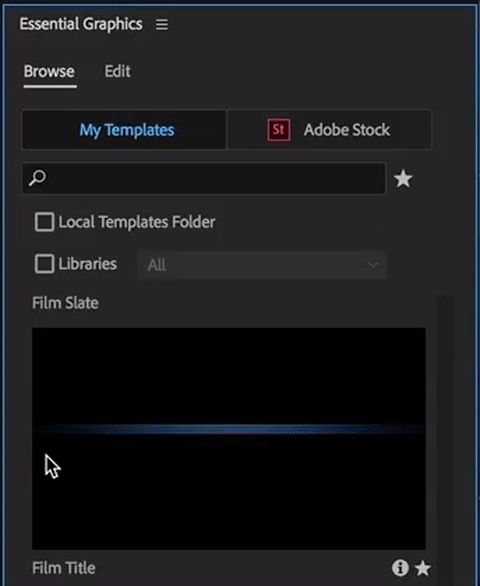
"My Templates" can be favorited by clicking the little star icon in the bottom right corner of the template thumbnail. Click the star by the search bar to limit search results to just favorites.

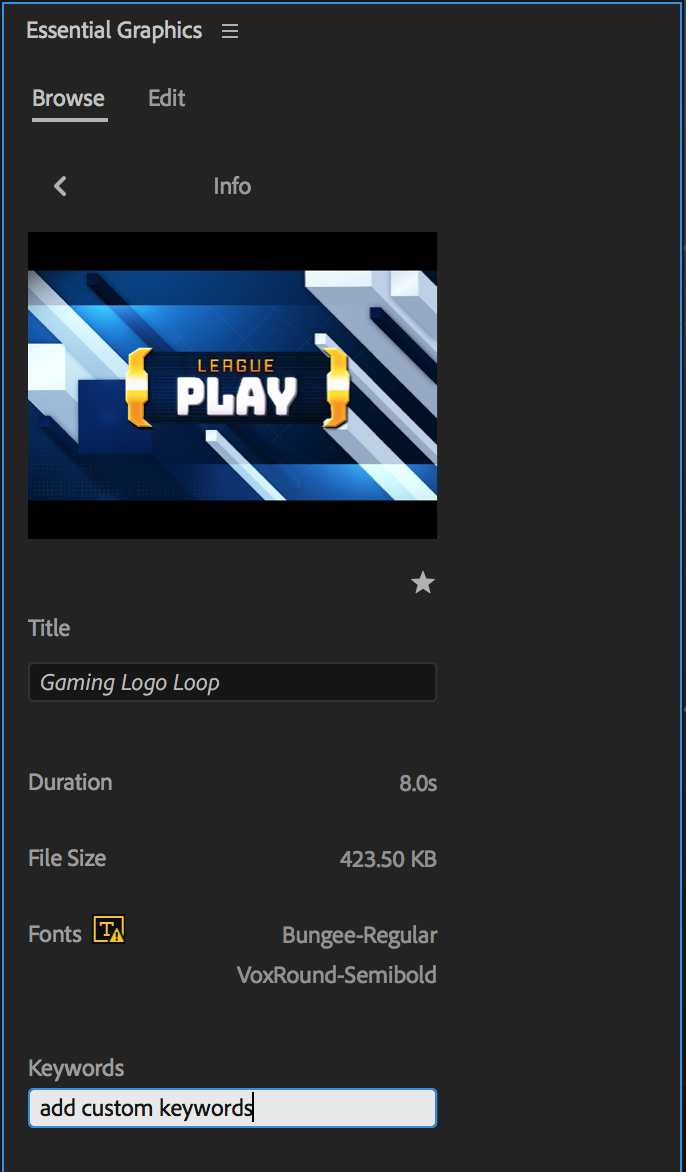
To the left of the star is the new Info icon which displays useful information about the template. Such as:
- Title
- Duration
- File Size
- Fonts
- Keywords
Users can add custom keywords to templates to make them more searchable.
Replace Motion Graphics Templates Workflow
You know how you can replace clips in the Timeline and retain the adjustments you've made to the original clips? Now you can do that with .mogrt files! Swap updated versions of Motion Graphics Templates like you would other clips and your customizations will be preserved. Simply hold Option/Alt and drag the new Motion Graphics Template version from the Essential Graphics panel onto the original in the Timeline. Adobe says "where possible, customizations will be preserved."
Auto Ducking
Premiere Pro 12.1 integrates the popular Auto Ducking feature in Audition in the Essential Sound panel.

The volume of music can be set to automatically lower when dialogue, sound effects, or other audio clips are detected, eliminating the need to manually adjust every point in the mix.
Ducking refers to lowering the music level beneath a dialogue track using audio keyframes; a very tedious process when done manually.

Now, thanks again to the power of Adobe Sensei, all the audio keyframes are created automatically!

Use Auto Ducking in 3 Steps
Once you've tagged your audio clips with the appropriate Audio Type in the Essential Sound panel, Ducking can be used on any audio, not just music and dialogue. Create dynamic audio keyframes with Ducking in 3 easy steps:

- Set the "Sensitivity," threshold that, when exceeded, will trigger the ducking.
- Choose how much you want the ducked clip to be "Reduced by."
- Choose how smooth you want the ducking to be with the Fades slider.
Click the Generate Keyframes button and voila! You can manually adjust the audio keyframes in the Timeline as needed. Fun fact: the Ducking is not adding keyframes to the clip volume, it's actually adding an Amplify audio effect to the clip and adding keyframes to that.

LEARN MORE: Auto-ducking (Official Adobe help page)
All-New Timecode Window
For some editors, a timecode display is critical, and for others it's just a way to make the edit bay look more impressive to a client. In Premiere Pro CC 2018 (12.1), the Timecode panel has a lot more practical use!
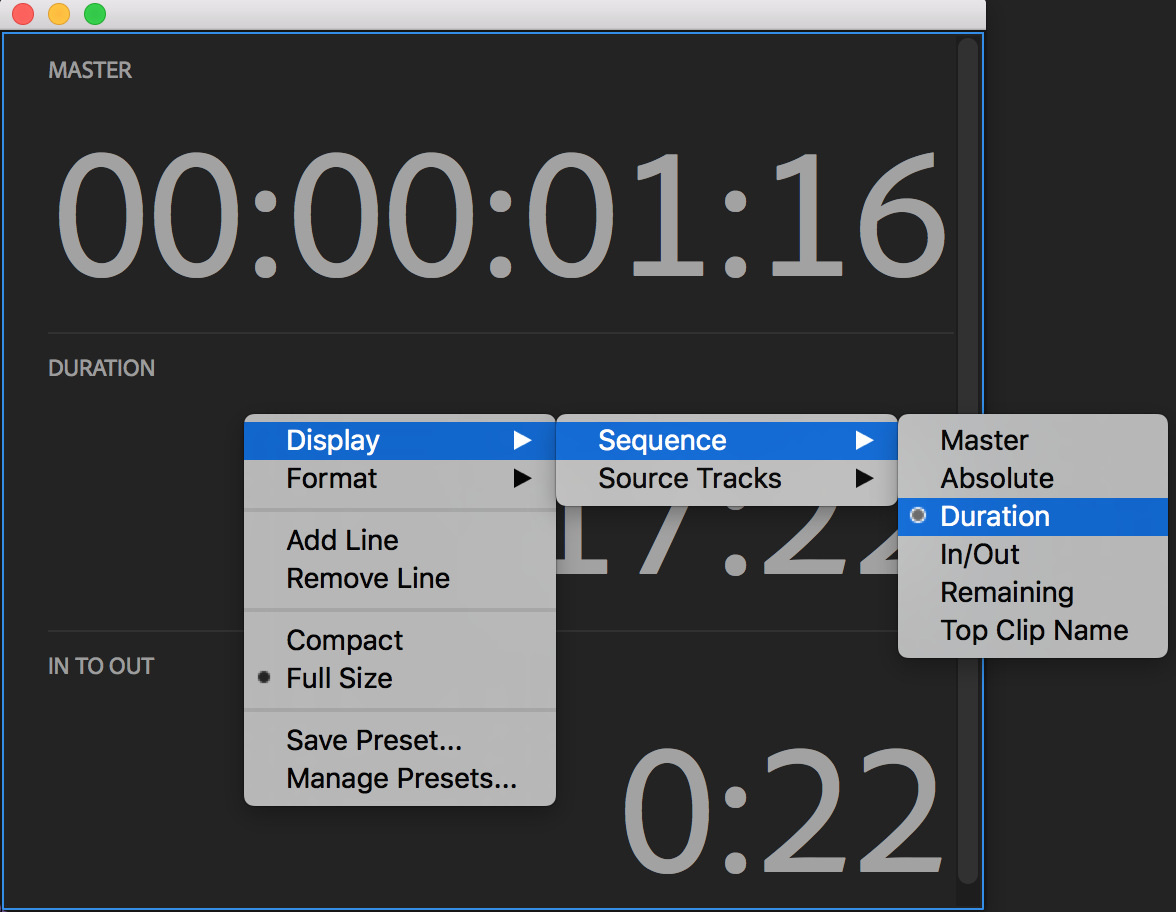
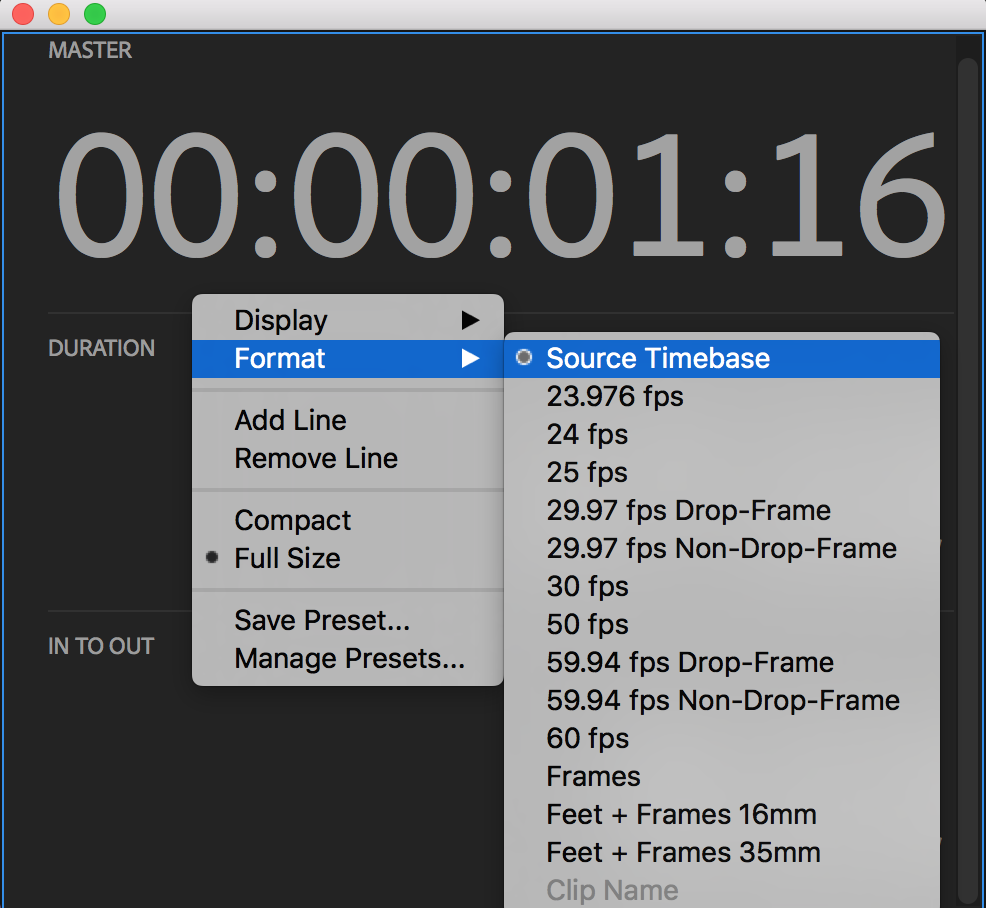
Right-click in the all-new Timecode panel to customize the display options. There are two Display options to choose from: Sequence and Source Track. The Timecode panel can display things like Master timecode, Duration, Remaining, In to Out, etc. Under Format you can select a custom frame rate or just stick with the Source Timebase. You also can add and remove lines of timecode, giving you a variety of options for tracking elements in your sequence. You can even choose to show Clip Names in the Timecode panel, which could save a hard squint at the Timeline.
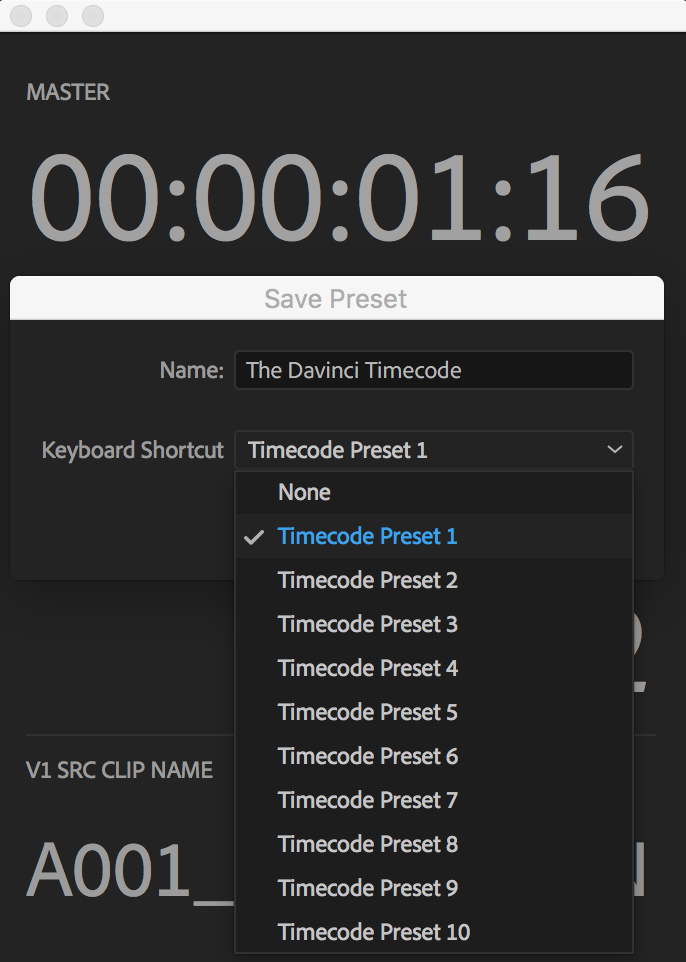
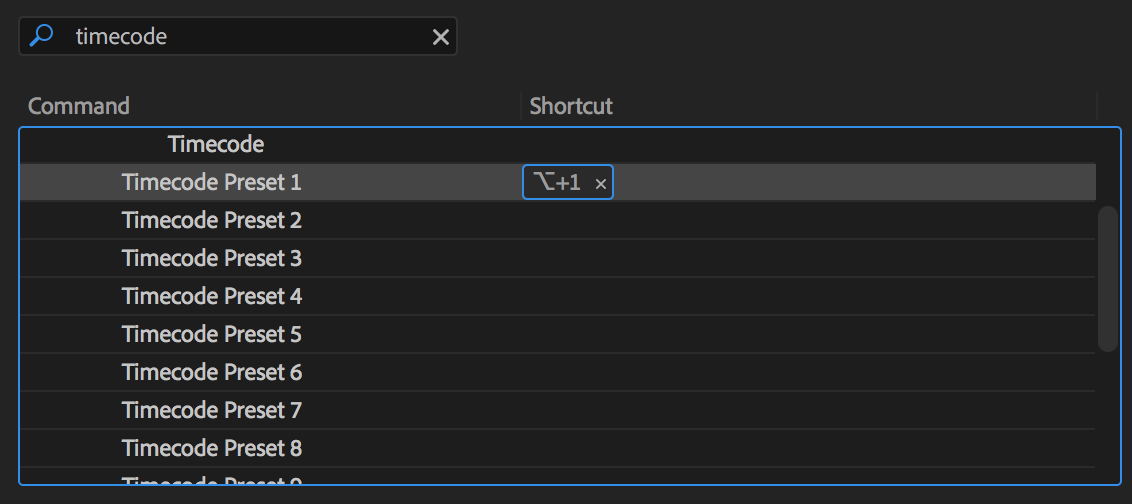
Another nice thing is you can save your timecode displays as presets and assign 10 of them as keyboard shortcuts.
The new Timecode panel is not the most exciting feature. But it's enough make you say, sure, I'll spend some of my screen real estate on that. The odd thing about this panel is it doesn't have the header or settings like other panels. So there's no way to dock it!
LEARN MORE: View timecode in the Timecode panel (Official Adobe help page)
Copy/Paste Includes Sequence Markers
If markers are a part of your workflow, you're going to be very happy with this new setting. In Premiere Pro CC 2018 (12.1) Sequences Markers can be copied and pasted and retain their information, position, and duration. Enable this feature under the Markers menu > Copy Paste Includes Sequence Markers.

Turn this setting on and Sequence Markers over a copied clip will also be copied and pasted into a new sequence. For markers with durations, the In point of the marker must be part of the copied region. One practical use for this new setting is copying and pasting Sequence Markers between selects sequences or pancake timelines.

LEARN MORE: Copy and paste sequence markers (Official Adobe help page)
Adobe Immersive Environment
New Navigator Window
Users can navigate the Adobe Immersive Environment with the new Navigator window in Premiere Pro CC 2018 (12.1). For example, it can act as a rear view mirror, allowing users to see behind them without having to physical look around the sphere. The Navigator can be docked and interacted with using the supported VR hand controls.
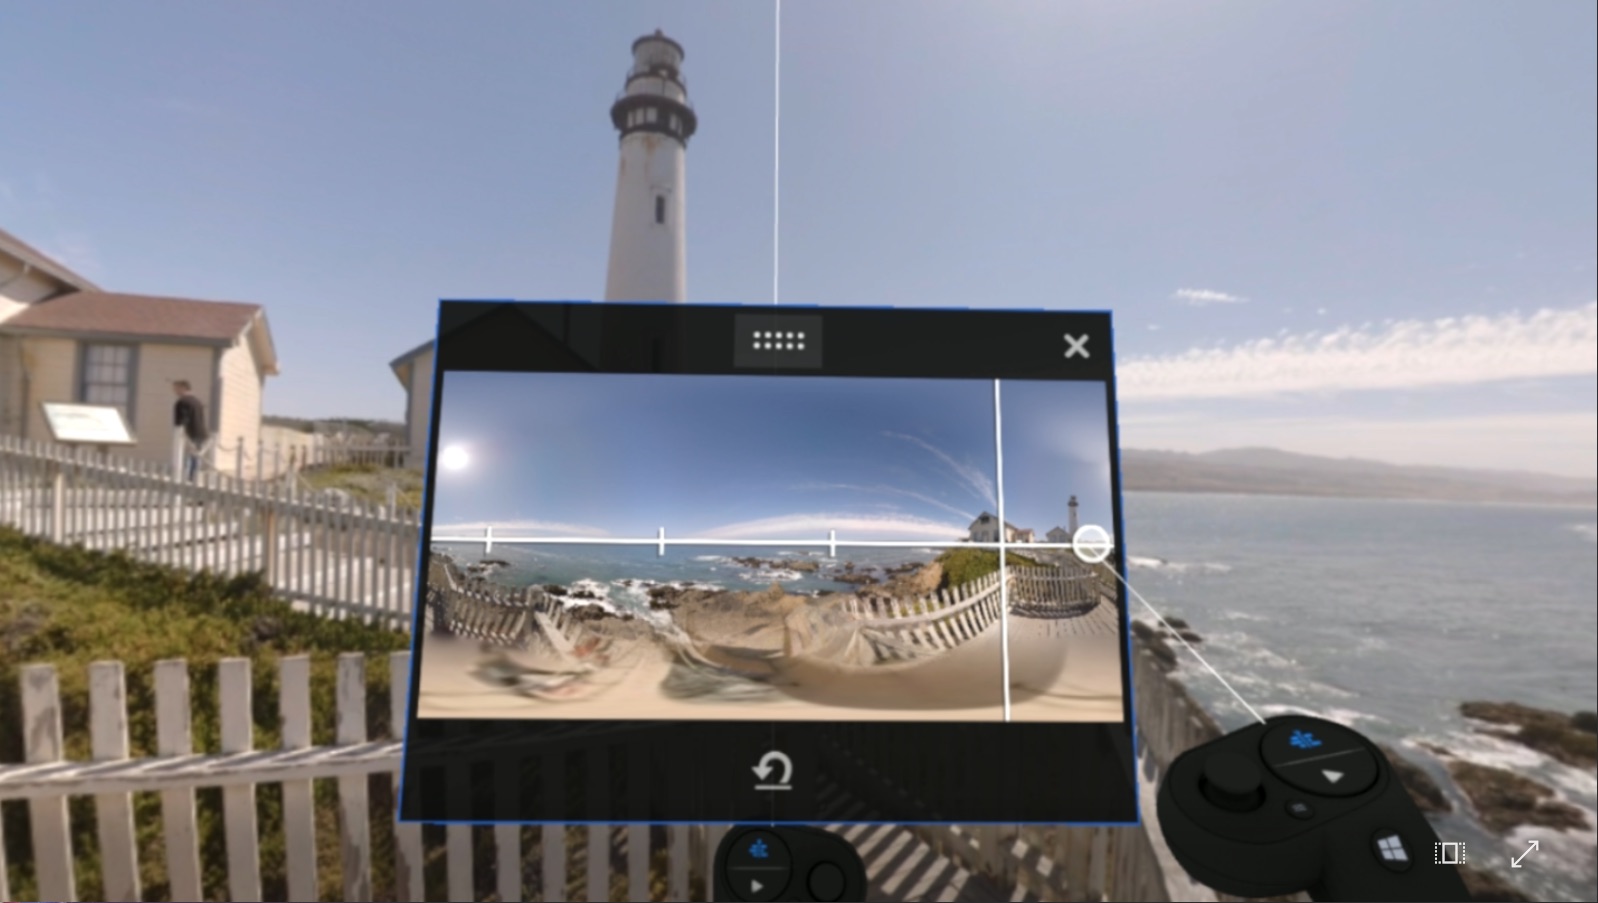
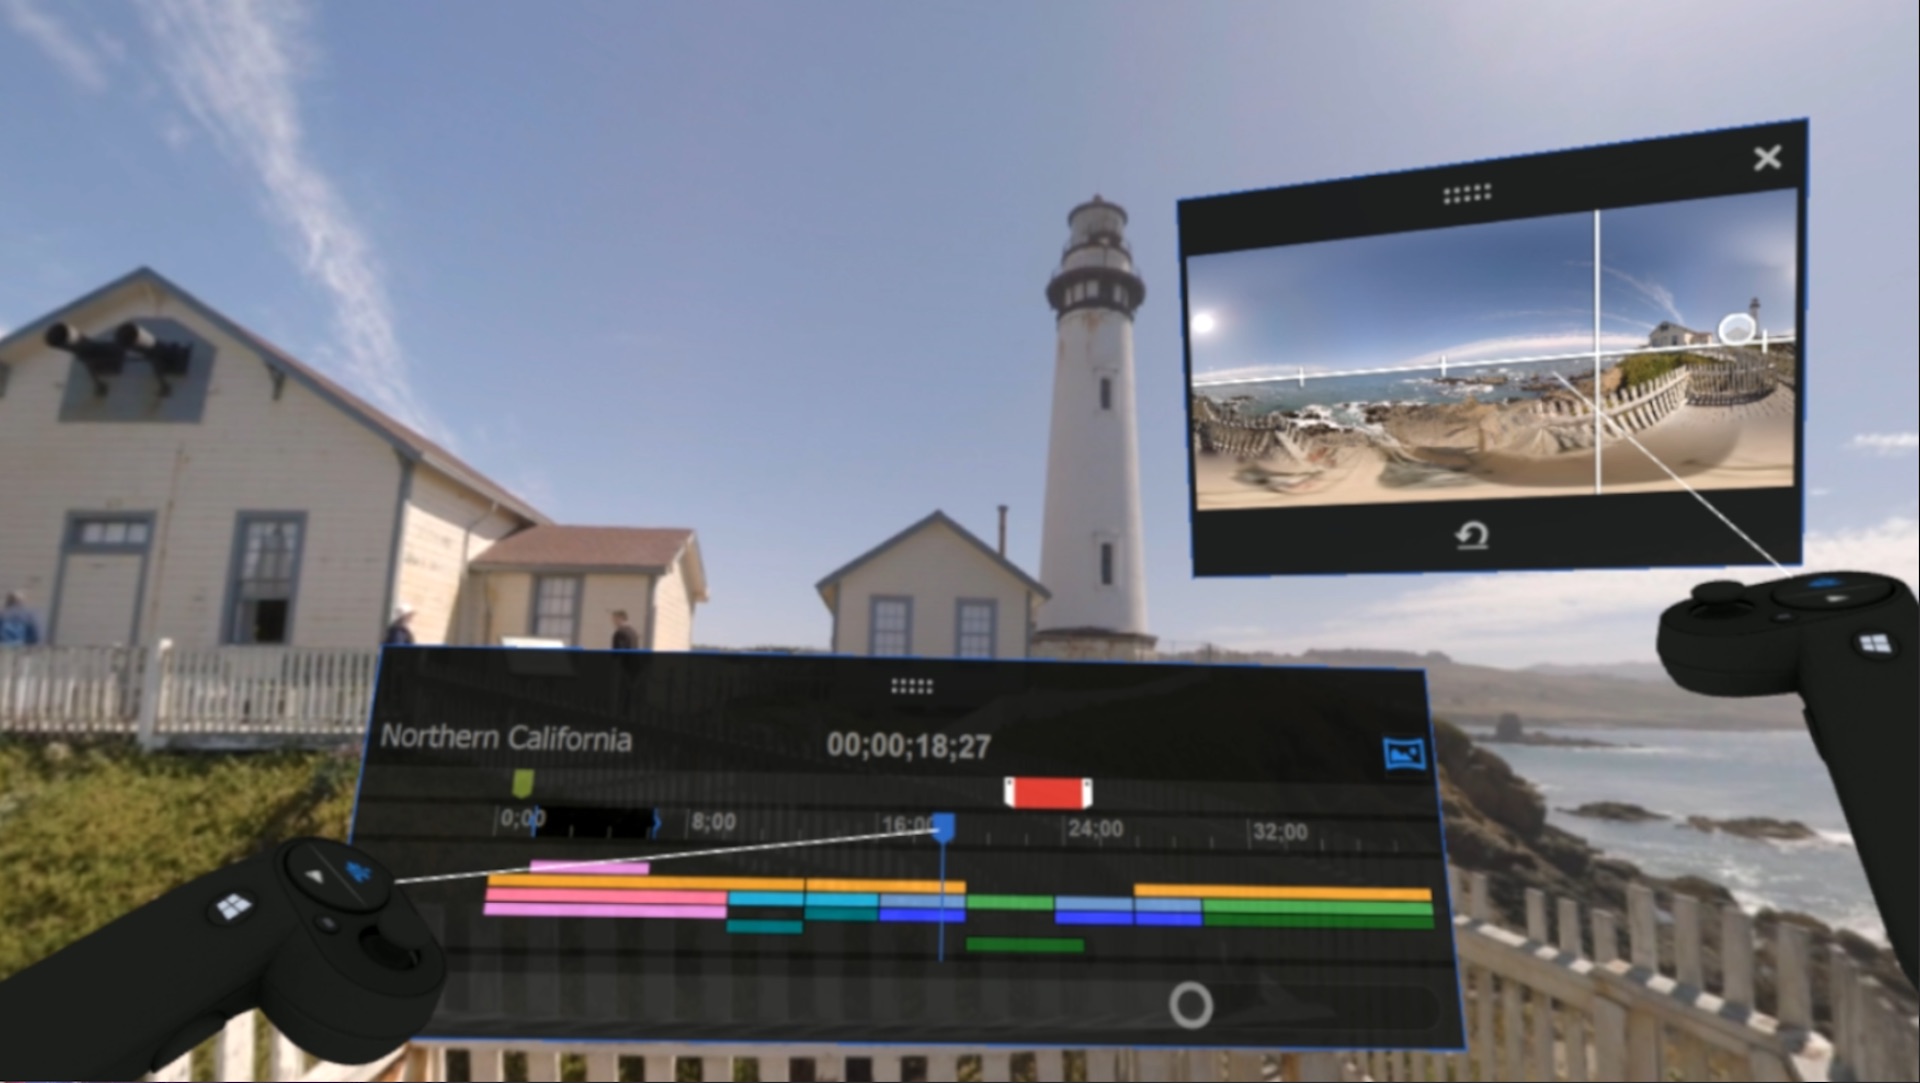
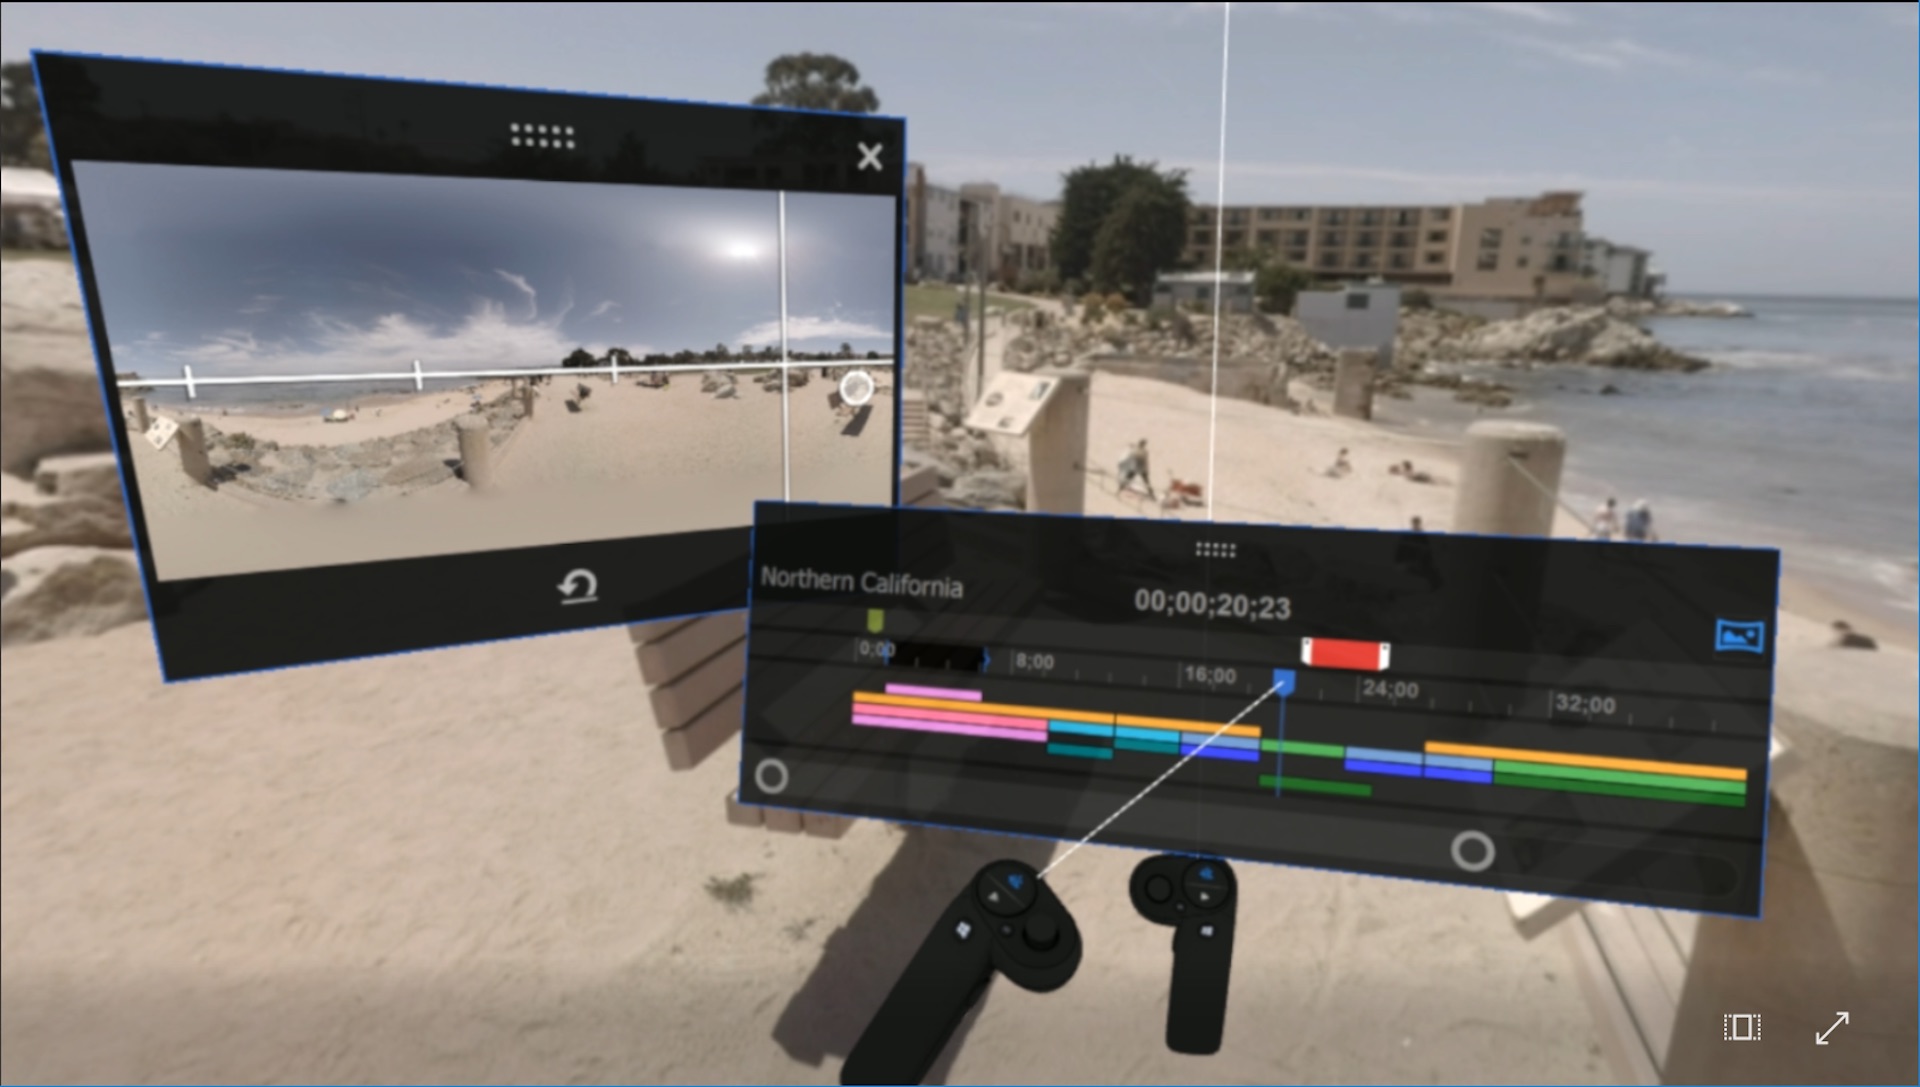
Support for Windows Mixed Reality
Added support for Windows Mixed Reality in Premiere Pro CC 2018 (12.1) expands the number of compatible Head Mounted Displays (HMDs) that can be used with Adobe Immersive Environment.
LEARN MORE: Set up VR headsets (Official Adobe help page)
Additionally, improvements have been made to the Immersive Effect VR Plane to Sphere and how it renders the edges of graphics.
Enhancements for Team Projects
The April 2018 release of Premiere Pro expands support for Team Projects in 3 ways:
- You can see which collaborators are online and offline
- You can embed linked Team Projects within a Team Project, as well as import local Premiere Pro projects
- You can open past read-only versions to import assets into the current project
Since Team Projects only apply to Creative Cloud for Teams and Enterprise subscribers, we recommend you visit the official Adobe release notes to learn more about these new features.
New Hardware Acceleration and (Un)Supported Formats
New Supported Camera Formats
Premiere Pro CC 2018 (12.1) adds support for the following 3 camera formats:
New Accelerated Hardware
Premiere Pro CC 2018 (12.1) adds support for the following hardware acceleration:
- "H.264 encoding on Windows 10 with 6th Generation (or later) Intel® Core™ processors and Intel Graphics enabled"
- "H.264 and HEVC encoding on Mac OS 10.13 systems with supported hardware"
Visit the official Adobe release notes for hardware acceleration to learn more
Support for QuickTime 7 Formats Discontinued
Support for QuickTime 7 era formats and codecs is officially ended. (Users were alerted to this change in Premiere Pro 12.0 and 12.0.1.) Now when you attempt to use these legacy formats, you will get a warning notification saying it is no longer supported. Not to worry, QuickTime compatible codecs such as ProRes, DNxHD, and Animation are natively supported in Premiere Pro. But, older formats like Cinepak and Sorenson are unsupported.
LEARN MORE: Dropped support for Quicktime 7 era formats and codecs (Official Adobe help page)
New Learning Premiere Pro Workspace
In any effort to make the onboard experience easier for new users, Premiere Pro CC 2018 (12.1) introduces a new Learning Workspace. Beginners can learn the basics of Premiere Pro right in the program. The new Learning Workspace can be accessed under Window > Workspaces > Learning.
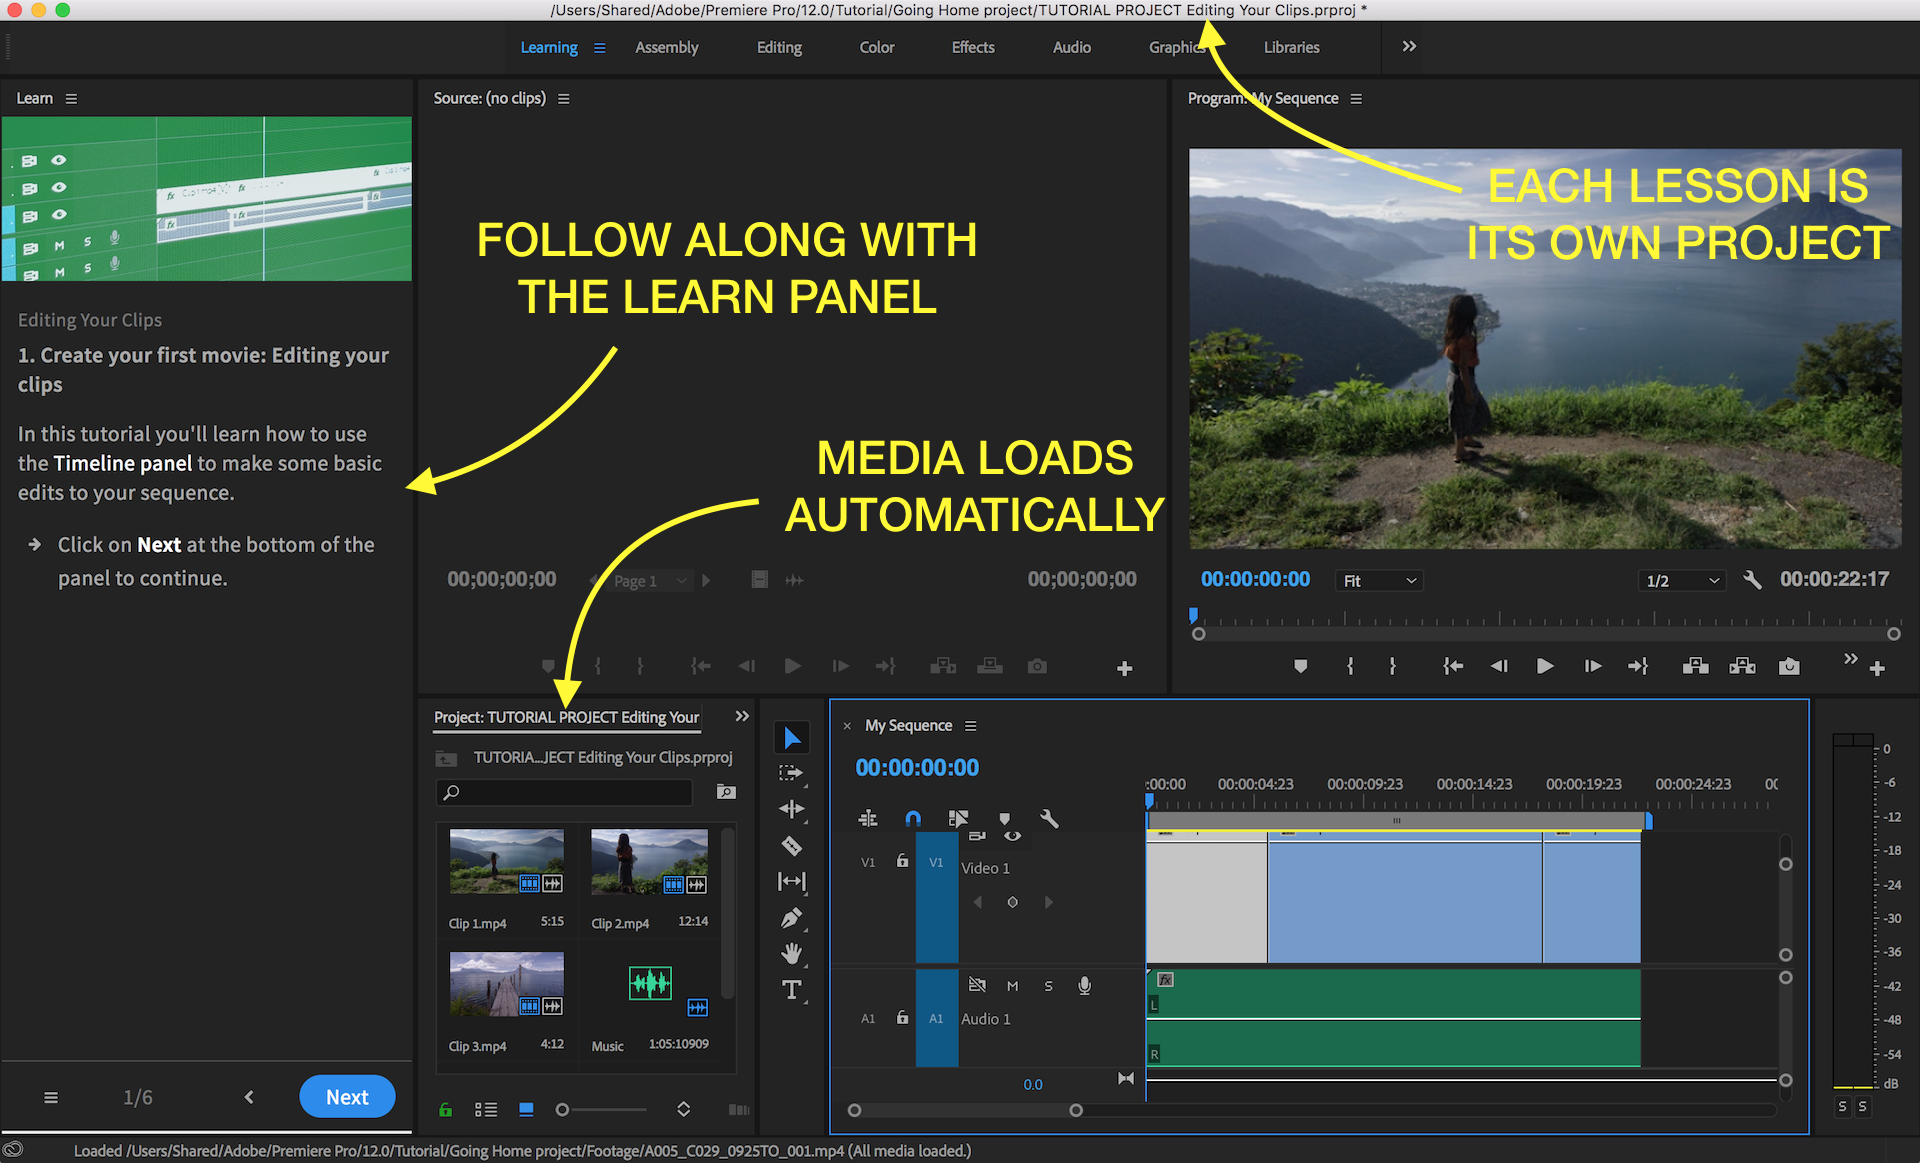
Users can open demo projects and assets directly in Premiere Pro. At the time of this writing there are 5 available lessons:
- Understanding the Premiere Pro Interface
- Importing Media
- Preparing Your Clips for Editing
- Editing Your Clips
- Exporting Your Project Content
Following the written and animated instructions in the dedicated Learn panel is simple and intuitive. Click through each of the steps to complete the lesson. At the end, you can return to the menu or begin your own project.

New Bug Report/Wishlist Form
Adobe has switched over to UserVoice, to host their customer feedback intake. The new Premiere Pro User Voice Site replaces the former Bug Report/Wishlist form. Users can now submit bug reports and feature requests in the "Enter your idea" field. Adobe recommends limiting your submissions to one topic at a time.

The real cool thing is you can vote on which features you would like to see, as well as sort by hot, top, and new submissions. Anyone want to start a new feature campaign and raise some votes?
Bug Fixes and Known Issues
Premiere Pro CC 2018 (12.1) comes with a significant amount of bug fixes. Including fixes for stability, playback and performance, editing and effects, export and render, and much, much more.
What are your thoughts on Premiere Pro CC 2018 (12.1)? Did we miss anything? Are you impressed with the Color Match and Auto-Ducking features? How about the new Essential Graphic updates? Talk to us in the comments below! This is why we do what we do!

