Pond5 Panel for Premiere Pro Review
Pond5's Panel Lets Video Creators Search, Edit Previews, and Purchase Stock-Media Without Ever Leaving Premiere Pro.
The primary goal of any Premiere Pro extension is simple: to save time. Obviously, an integrated panel saves time by allowing the editor to continue working within Premiere Pro instead of having to open third-party software. There are few other industries that care more about time-saving workflows than the post-production industry. If you’re a company that creates software for video editors, your greatest sell is how it saves time. (Bonus points if it saves time AND stays on budget.) What’s an easy way to save video editors time? Convert your software into a panel for Premiere Pro!
Pond5 is royalty-free stock-media library with over 8 million HD and 4K video clips, and they recently released their own panel for Premiere Pro. The Pond5 workflow in Premiere Pro is both excellent and intuitive. As video creators, it’s so nice to finally live in a time when we can search and purchase content from the web without leaving Premiere Pro.
Pond5 makes a solid effort to get you using the panel by giving away 50 pre-selected clips for free. (You can find them in Collections.) They’re more than enough to give the full experience of Pond5’s Premiere Pro panel. (Hey Pond5! How about a competition for the best-edited video using only the 50 free clips? Winner gets a year of free Pond5 stock footage. Just throwing it out there.)
4 Goals of Stock Media Add-on
As a video creator, and specifically as a Premiere Pro user, I want any stock-media panel to do 4 things:
- Search the entirety of the library
- Save favorites
- Purchase/license clips directly in Premiere Pro
- Preserve all intrinsic effects (position, scale, rotation) and VFX
Spoiler: The Pond5 panel does all 4!
Let’s quickly cover how to install the Pond5 add-on in 3 steps. Then we’ll cover the process of searching, downloading previews and purchasing. Finally, we’ll look at some of the other features that make the Pond5 add-on a powerful stock-media integration.
How to Install the Pond5 Add-on
STEP 1
Click the button below to go to the Pond5 Adobe Add-on page where you can sync the Pond5 add-on to Premiere Pro.
Click the “FREE” button to acquire the add-on. (You may be prompted to sign in to your Creative Cloud account.) You will be notified that the add-on has been acquired, and it will automatically be installed. Restart Premiere Pro.
STEP 2
To open the add-on in Premiere Pro, go to Window > Extensions > Pond5. Dock the panel wherever you desire. If you don’t see the add-on under Extensions, open the Creative Cloud Desktop App, where you should see the add-on was installed in the Activity Stream. If not, make sure you’re signed in to the right Adobe ID and file syncing is turned on. Click the gear icon in the top right, go to Preferences > Creative Cloud > Files and turn sync on.


STEP 3
In the Pond5 panel, click “Log in” in the top right and log in to your Pond5 account. If you don’t have an account, click Sign up to create an account in your web browser.
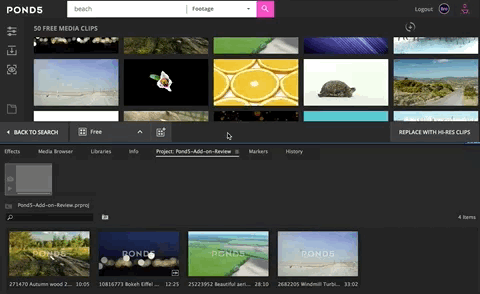
Once you’re signed in, you can access the 50 free clips under the Collections tab at the bottom of the Pond5 panel.
Set the Destination Folder
First things first: set your destination folder. This is the location where your Pond5 media, previews, and purchased files will be saved. I suggest making the destination folder a permanent location, like a system drive - someplace that all Premiere Pro projects can access and that won’t go offline.


NOTE: Beware of changing the destination folder mid-project. It only happened once, but I got a generic import error when I tried replacing previews with hi-res versions after moving my destination folder. Additionally, it’s easy to lose track of your assets if you’re constantly moving the destination folder.
Super Search Filters
One of the greatest strengths of the Pond5 panel is its search filters, which allow you to browse Pond5’s extensive video library by resolution, fps, price, and duration. Check your desired resolution and fps, and use the price and duration sliders to get the results that meet your project specifications and budget.
NOTE: The same search filters apply to searching Pond5’s Public Domain items, but searching Music and SFX is limited to Price and Duration.
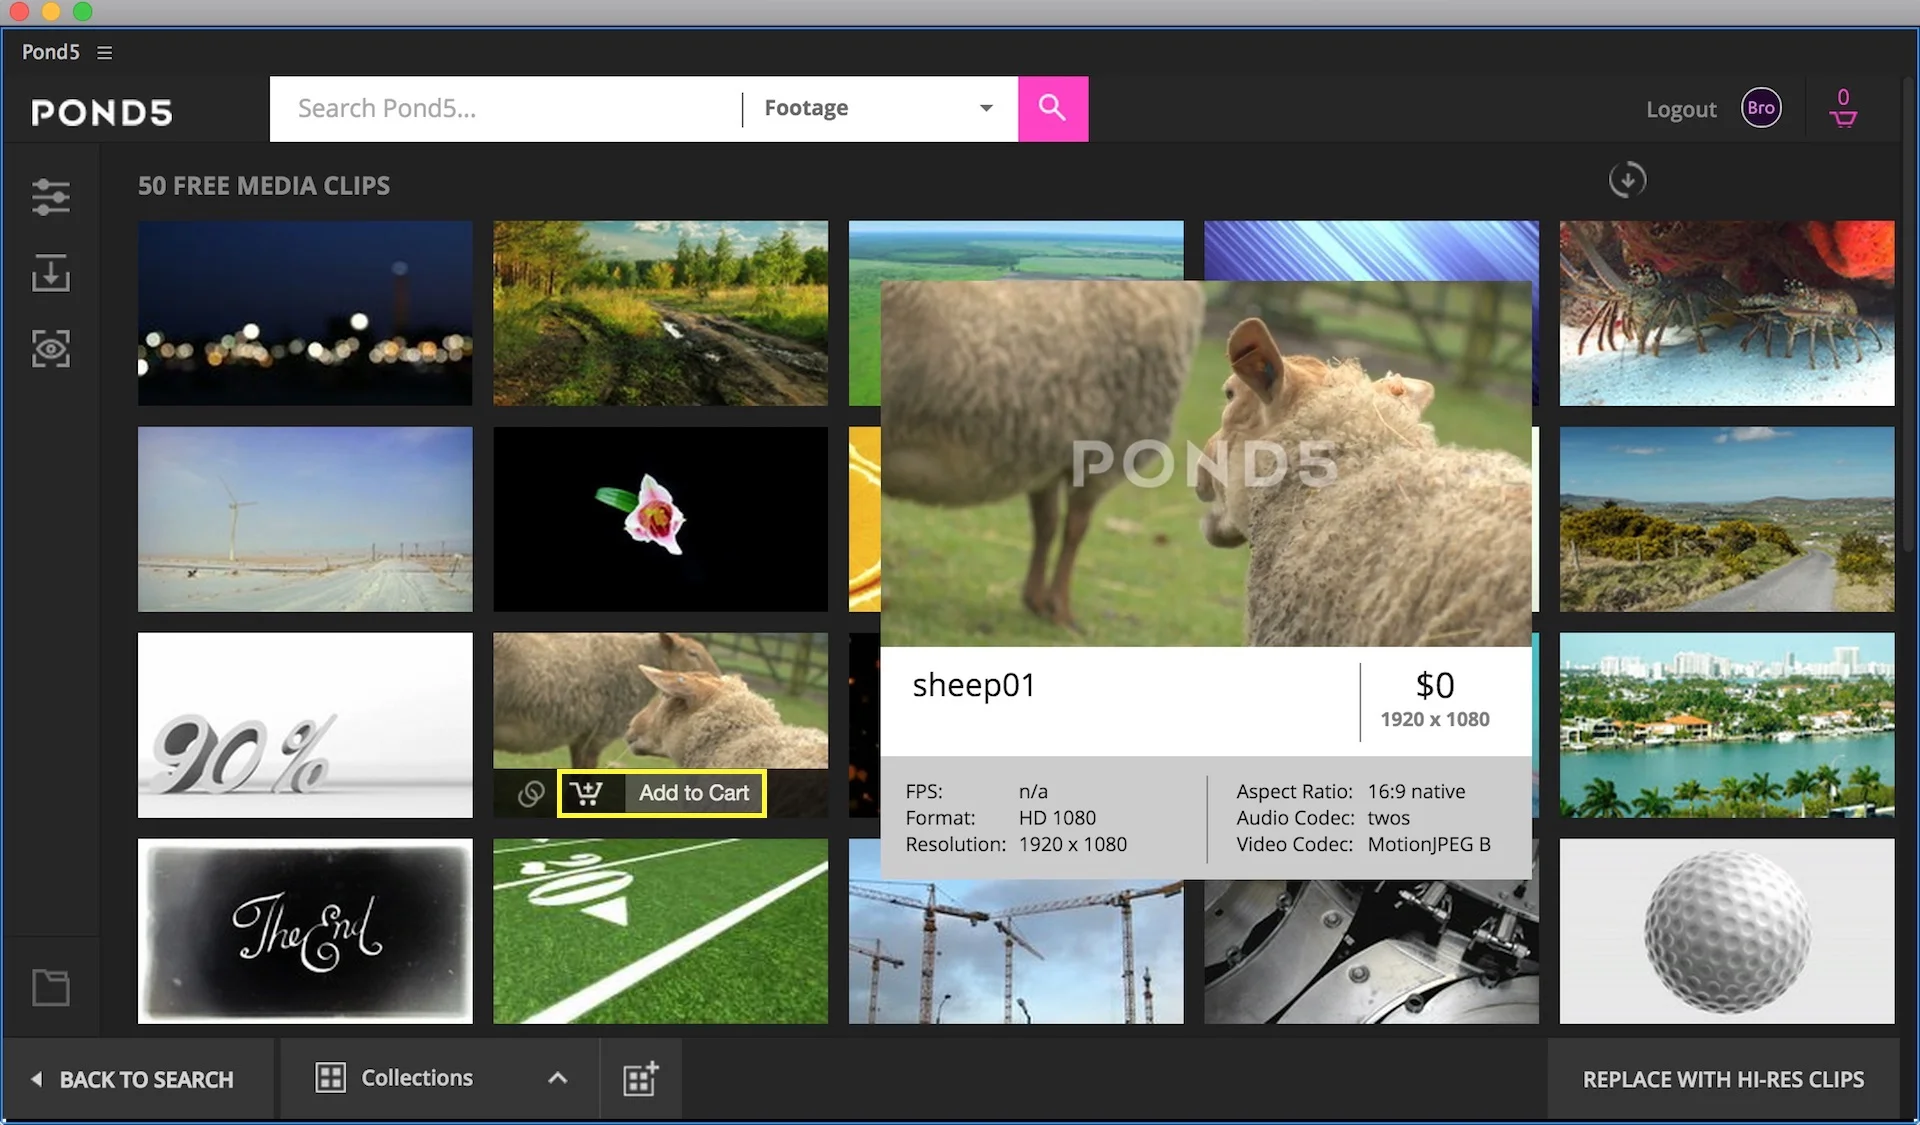
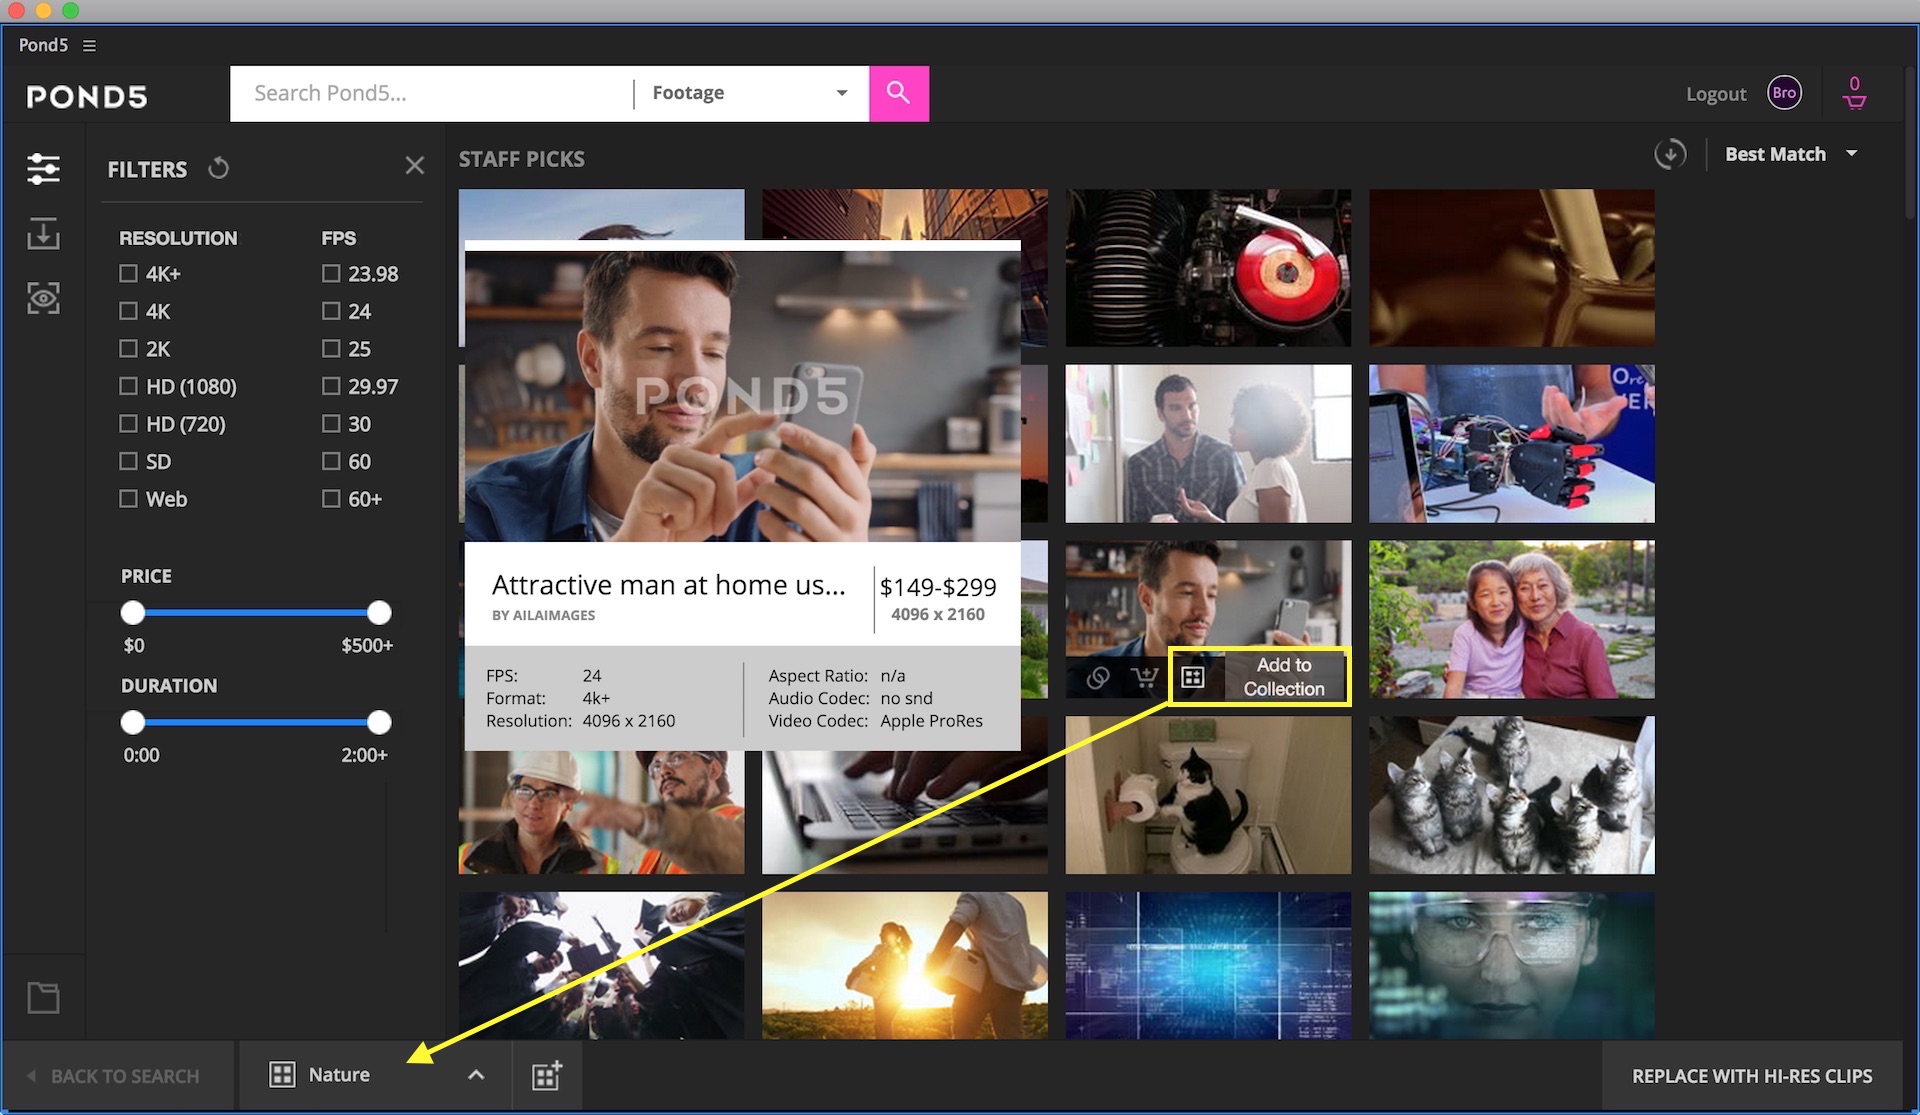
It’s easy to preview clips in the Pond5 panel. Hovering over clips triggers a pop-up preview window where you can watch the clip. Hovering also triggers an overlay menu with three icons: Visit Web Page, Add to Cart, and Add to Collection. (Under the My Imported Previews tab, you’ll also see a trash-can icon to delete downloaded previews.) We’ll go over each of these clip options throughout the post.
If you’re like me, you’ll probably be tempted to double-click a clip to open it, but there’s no player in the Pond5 panel. In fact, you’ll probably be surprised when you click a clip to play it and it starts downloading into your project.
How to Import Previews
Importing previews from the Pond5 panel into Premiere Pro is SUPER easy. Perhaps even too easy. Just clicking clips adds them to your project.
All Pond5 preview clips are 640x360 and watermarked. Once they’re in your Project you can edit them as you would any other media. You can even add markers and metadata to preview clips, and that information will be preserved when they’re replaced with hi-res versions.
The one thing you MUST NOT do with preview clips is rename them. If you rename them, the Pond5 panel will not recognize them when you try to replace them with hi-res versions.
The Pond5 Panel and Scale
The ability to download and work with previews before purchasing them is awesome. There’s no better way to audition your clips for yourself and your stakeholders. The best part is all your intrinsic and visual-effects work is preserved when you replace your previews with the hi-res files.
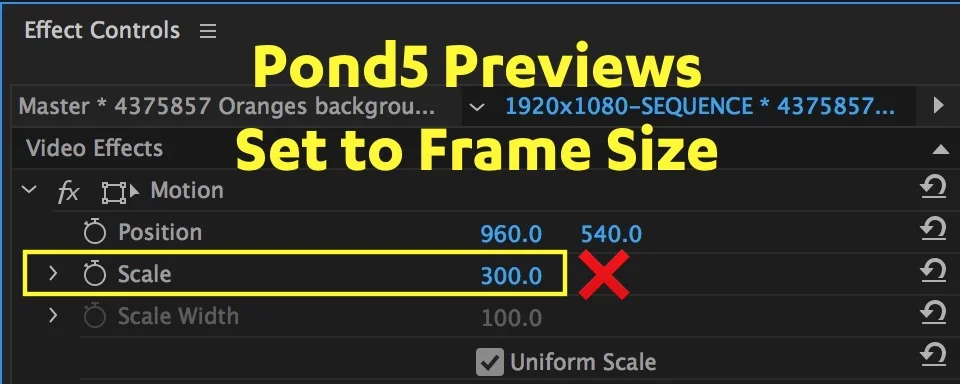
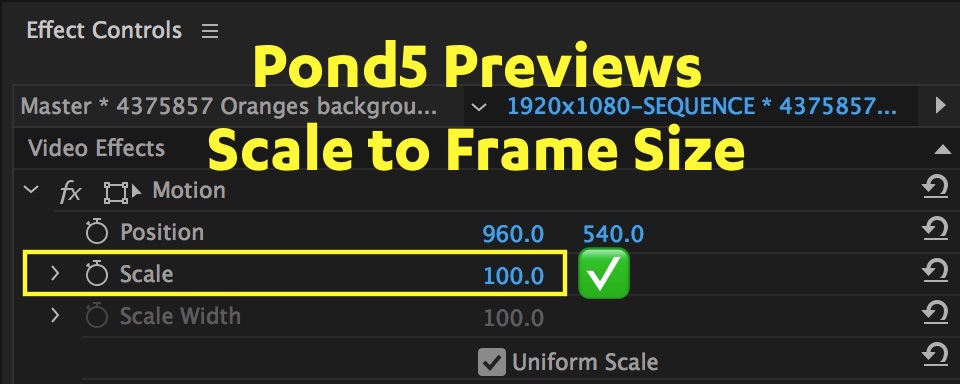
It gets tricky with scale.
The Pond5 panel does NOT automatically adjust for relative scale when replacing previews with hi-res files. For this reason, it is crucially important to use Scale to Frame Size before you do any scaling with previews. If you manually scale to frame size or use Set to Frame Size, all scale keyframes will have to be redone after hi-res replacement.
For example, let’s say you’re working on a rough cut and you add a 640x360 preview clip to your 1920x1080 sequence. It would look like this:
No one wants to work like that, and you certainly wouldn’t want to show your rough cut to a producer or client like that. So, you scale your clip up to 300% to fit the frame. Fast forward, you’re ready to purchase the clip and replace the preview with the hi-res version. The Pond5 panel doesn’t automatically bring in your hi-res footage at 100% scale or preserve the relative scale of any keyframes you may have added. The hi-res footage comes in scaled to the same size as the previews, in this case 300%. No good.
Here’s what you should do instead. When you bring your 640x360 preview into your HD or 4K sequence, first right-click and Scale to Frame Size. This rasterizes the clip to fit the frame at 100% scale. Now when you replace your preview with the hi-res footage, it comes in as it should, scaled to 100%.
Purchasing Media
There are 2 methods of adding clips to your cart in the Pond5 panel: “add to cart” or “replace with hi-res versions.”
ADD TO CART
You can manually add clips to your cart from the Search or My Imported Previews pages. Hovering over clips triggers an overlay menu with a pop-up video preview of the clip. In the overlay menu, click the cart icon to add the clip to your cart.
REPLACE WITH HI-RES CLIPS
The second way is via the “Replace With Hi-Res Clips” button. This method requires that clips be used in a sequence, because the Pond5 panel only replaces clips that are used in a sequence. I prefer this method over manually adding clips to the cart. This way also ensures you’re purchasing ALL the stock clips in a sequence in one fell swoop.
When you click the “Replace With Hi-Res Clips” button, you will be asked to choose the sequence with the clips you want to purchase. After selecting your sequence, you will see the list of all the stock clips (and their price) used in that sequence. In this example, I am using some of the 50 free clips, so the cost is $0. Any available resolutions (HD, 4K, etc.) would appear in the Resolutions column.
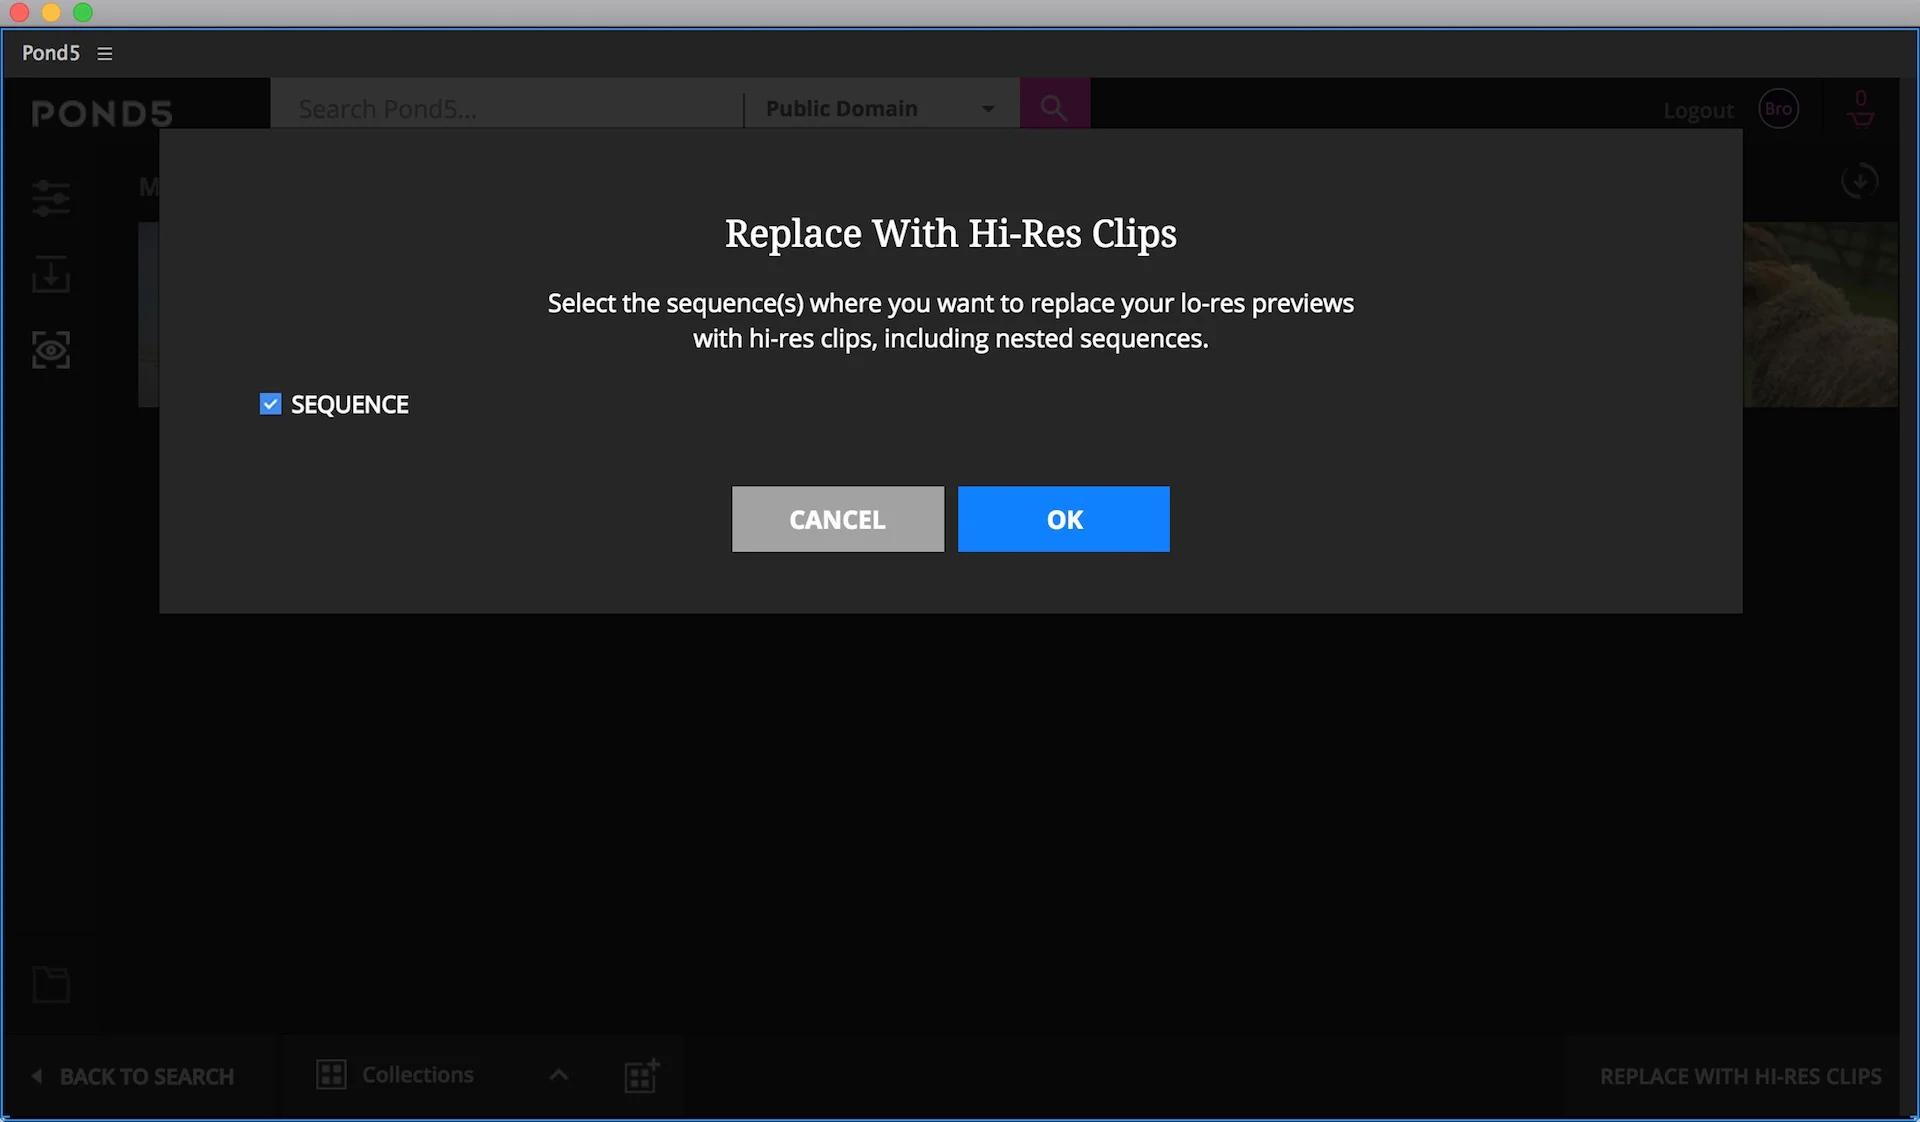

Click “Proceed” and the clips will be added to your cart, and you will be taken back to the list of sequences. Click away or click cancel and you will be in your cart, ready to check out. Here you can apply a promo code or click “Checkout” to finalize your purchase. Hovering over the “Checkout” button conveniently displays the final total.
When you click “Checkout,” you will have to select the billing address (or enter a new one) and agree to the Royalty Free License Agreement.
NOTE: I entered all my billing and payment information when I first signed up for my Pond5 account. If you do not have a credit card on file, I assume you will prompted to enter one at this point. I do not know if you are able to enter it within the panel or if you will be taken to a web browser.
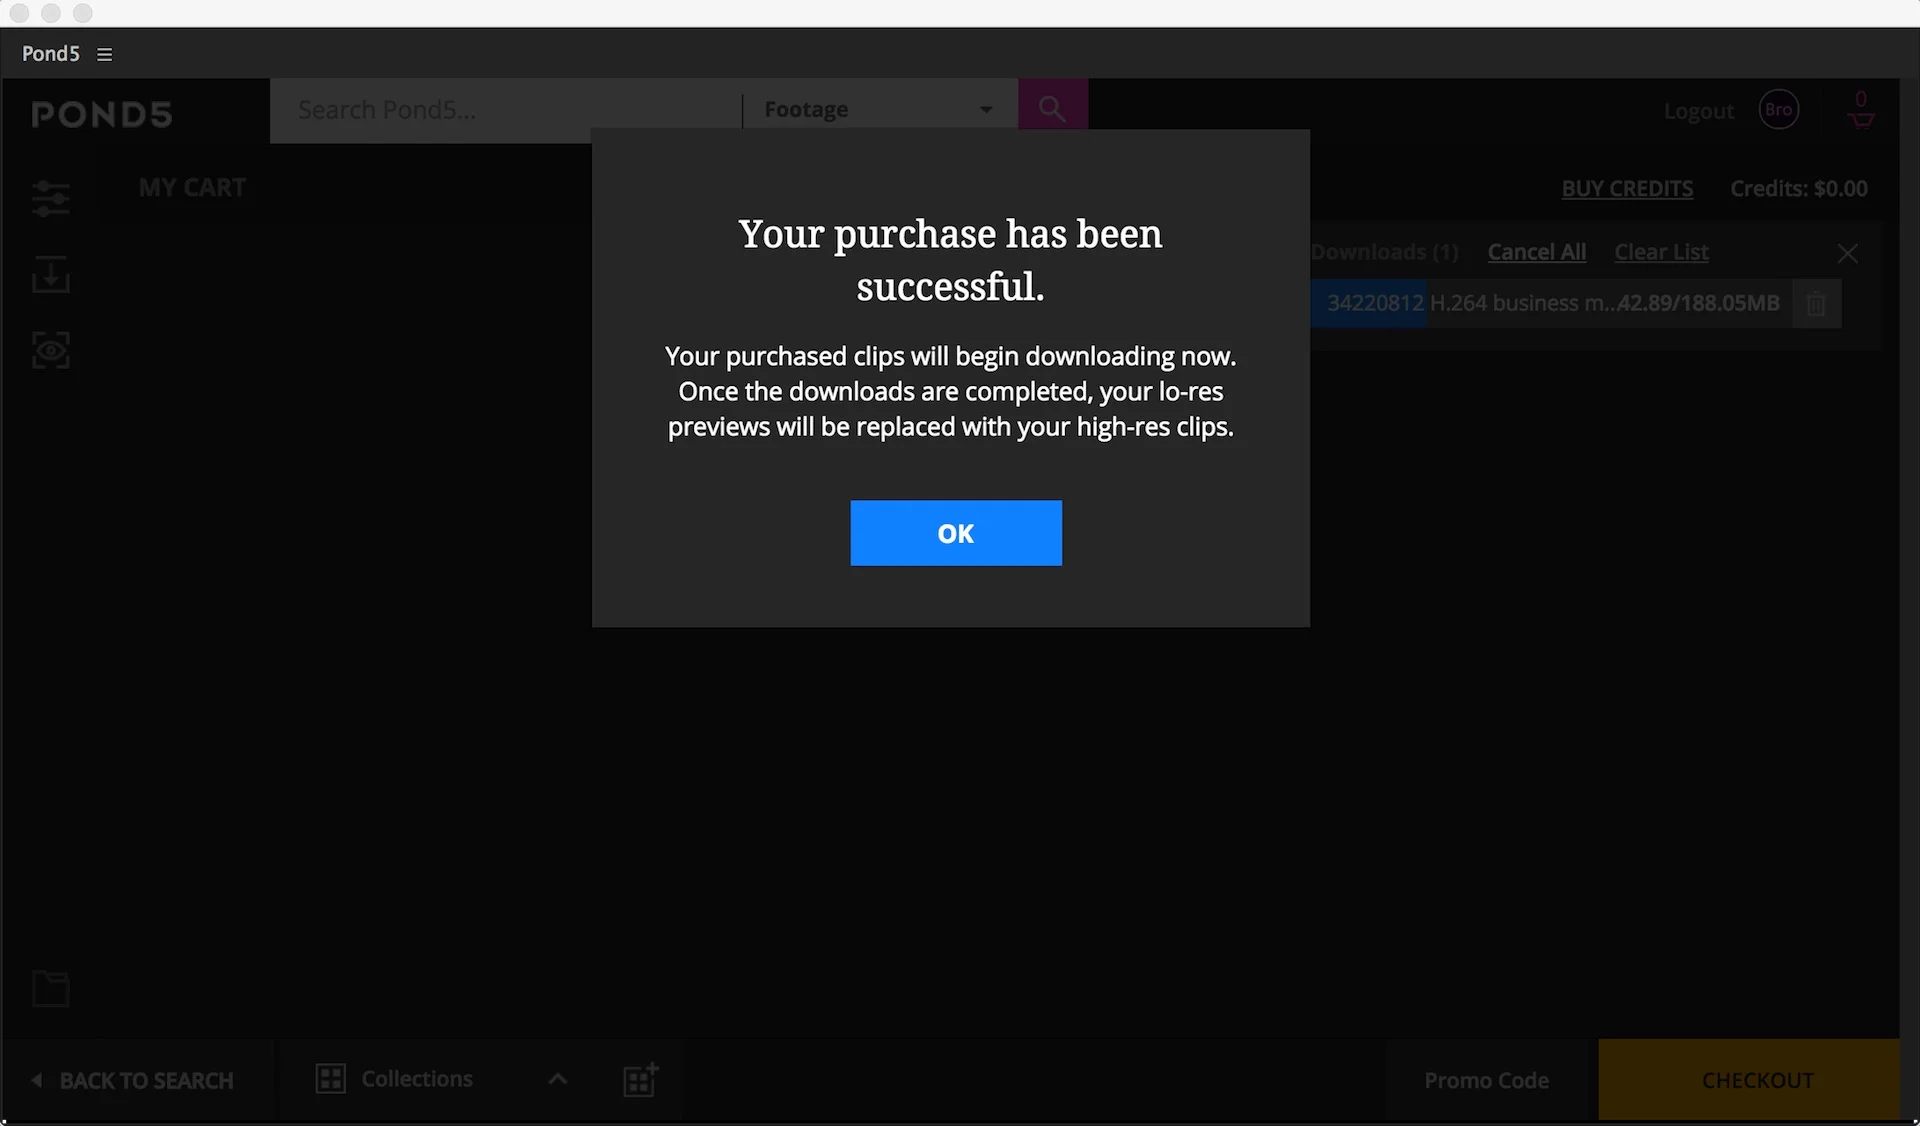
Click "Proceed to Checkout" where you will be notified that your purchase was successful, and that your preview clips will automatically be replaced with the hi-res versions
After purchasing clips via the "Add to Cart" method, you will be taken to the My Downloads tab, where you can select which version of available hi-res formats (h.264, ProRes, etc.) you want to download. (Not all Pond5 footage has the same hi-res versions.) Then you will have to "Replace With Hi-Res Clips" to switch the previews with the hi-res files. It's the same as described above without the purchase step.


You’ll receive an email containing your purchase receipt and license. Click the “Download Your Files” button in the email to go to your Order History, where you can download a PDF of the license and receipt, as well as copy the Credit Attribution.
My Imported Previews Tab
It’s easy to find and re-download previously imported previews in the My Imported Previews tab on left hand side of the panel. The one-click import applies to previously imported previews.
The curious thing is that clicking on imported previews opens the Download Progress display. It’s odd because these previews have already been downloaded to the destination folder. Basically, the Pond5 panel is overwriting existing preview files every time you click the clips in the My Imported Previews tab. I guess it’s Pond5’s way of eliminating any user error in case preview files have been tampered with.
Removing clips from the My Imported Previews page does not delete the preview files from your system.
My Downloads
Similar to the My Imported Previews, you can browse and download previously purchased media from the My Downloads tab. Again, removing clips from the My Downloads page does not delete the files from your system.

Purchased media behaves a little differently than previews in the Pond5 add-on. For example, you are not able to import purchased footage directly from the My Downloads page. (It would be nice if Pond5 added that one-click import functionality here!) Instead, you have to manually import them like any other footage.
Unlike previously imported previews, the Pond5 panel does NOT re-download hi-res files. This means if hi-res files get moved or renamed on the file level, the Pond5 panel won’t recognize them and you’ll have to download them again.
As mentioned earlier, the My Downloads tab is where you can select which hi-res version you want to download. Not all Pond5 media has multiple format versions, but if they do, this is where you can access them. Click “Choose Version” and select the format you want to import.
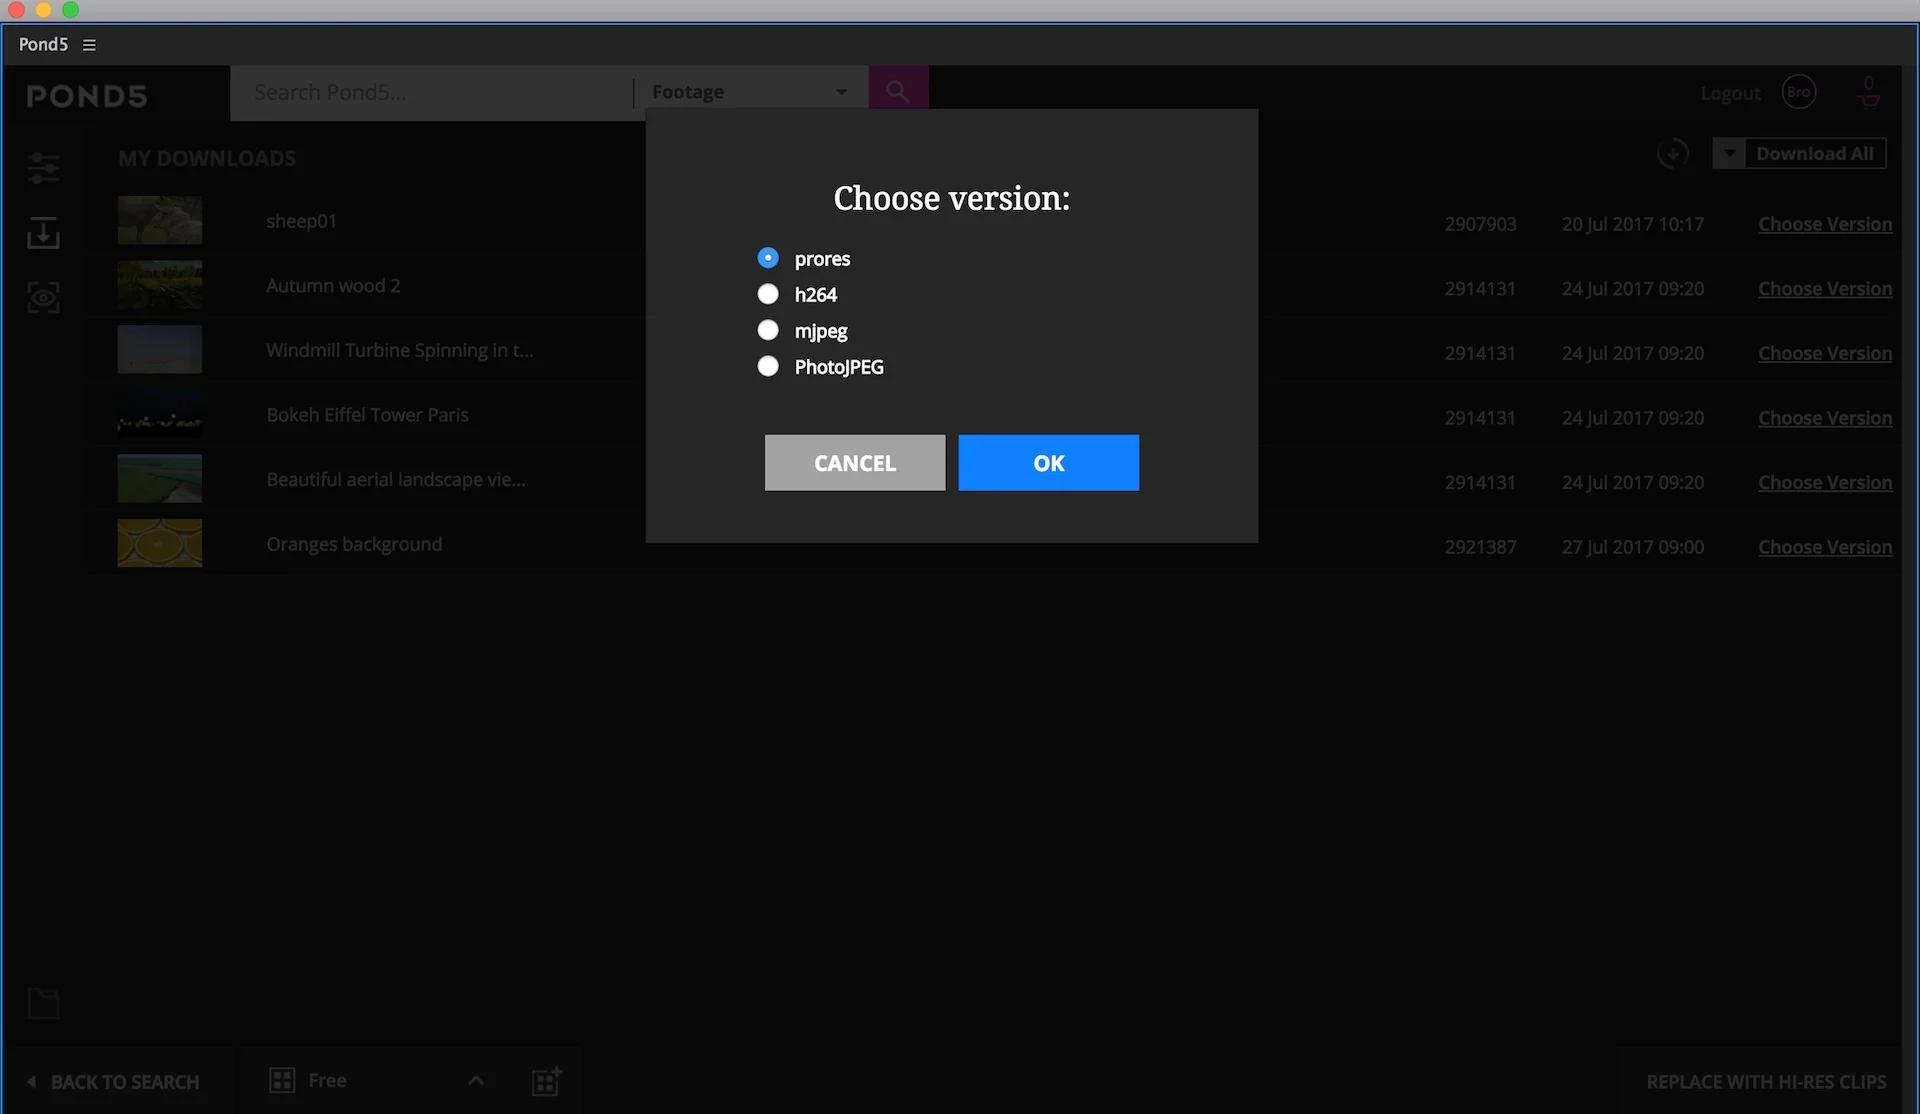
I haven’t found any rhyme or reason to Pond5’s hi-res version download or replacement. When you download a different version, it doesn’t replace the existing hi-res files in your project. If you delete one of the hi-res versions from the purchased folder, the add-on automatically replaces preview clips with one of the other hi-res versions.
Download Progress Window
At all times, you can find the Download Progress button, which displays all past and current downloads. It automatically opens when downloading previews and hi-res files. There may be times when you want to download a previously downloaded preview. You will be prompted to clear it from the Download Progress window. Click the Download Progress button (downward arrow) and click “Clear All.”

Obviously, this is where you can cancel downloads in progress.
Creating, Viewing, and Adding to Collections
While you’re browsing the Pond5 library, you will inevitably come across clips you will want to save for later use. These can be saved as “collections.” To create a collection, click the square icon with the plus symbol on the bottom of the panel. Give your collection a name (i.e. name of project or client) and press create. Now you can start adding clips to your collection.


Add a clip to a collection by hovering over it and clicking the collection icon from the clip’s overlay menu that appears.
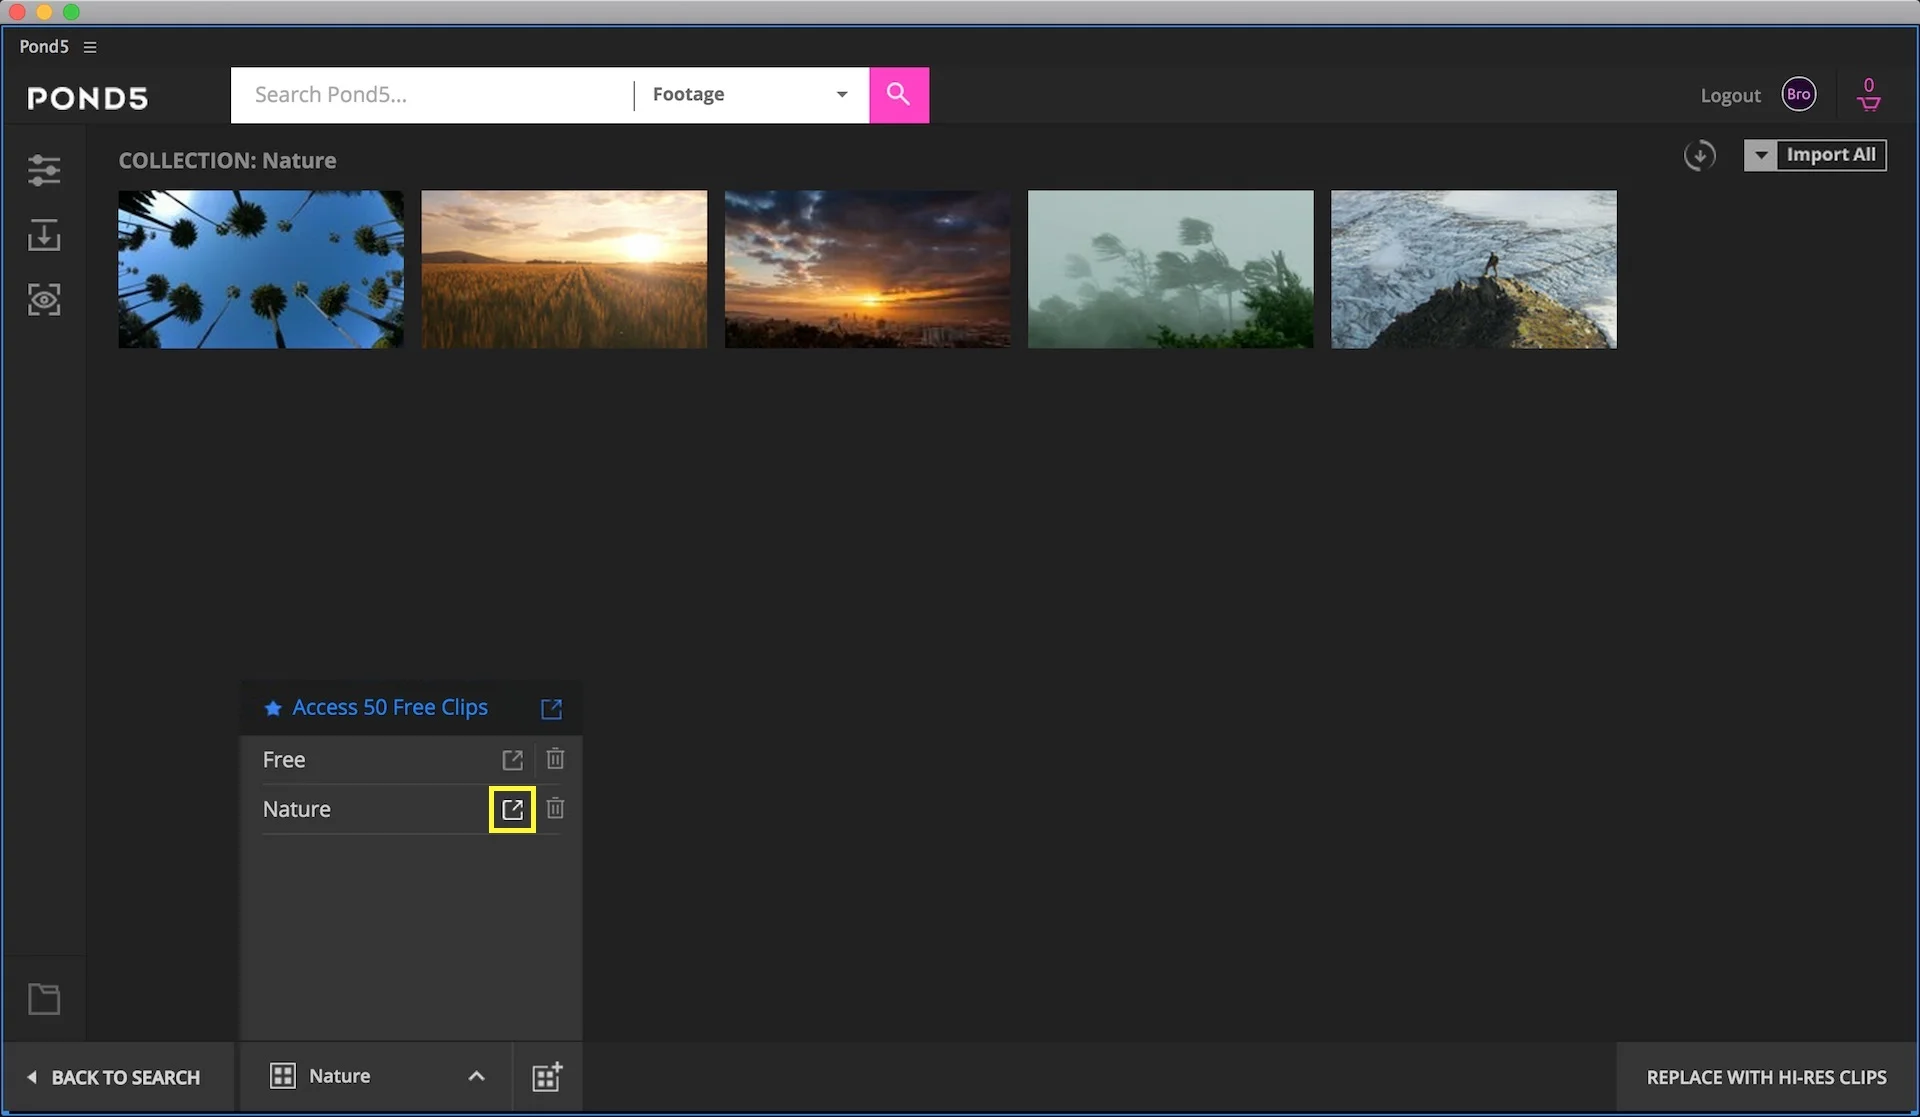
One thing that caught me by surprise is selecting a collection in the collection menu doesn’t open it; instead, it switches the collection where clips are saved. In other words, clicking on a collection makes it the active collection where clips are being saved.
So how do you view your collections? Well, to the right of each collection is a square-arrow icon next to the delete (trash-can) button. Honestly, it looks like a view-on-web button. In fact, I was initially disappointed that I was only able to view my collections in a browser. That’s not the case. Clicking the icon opens your collection in the Pond5 panel. Whew!
While it did take me a second to understand how collections worked in the Pond5 panel, it turns out to be a very speedy way to add clips to a collection. Just remember to switch your active collection before saving clips for a different project.
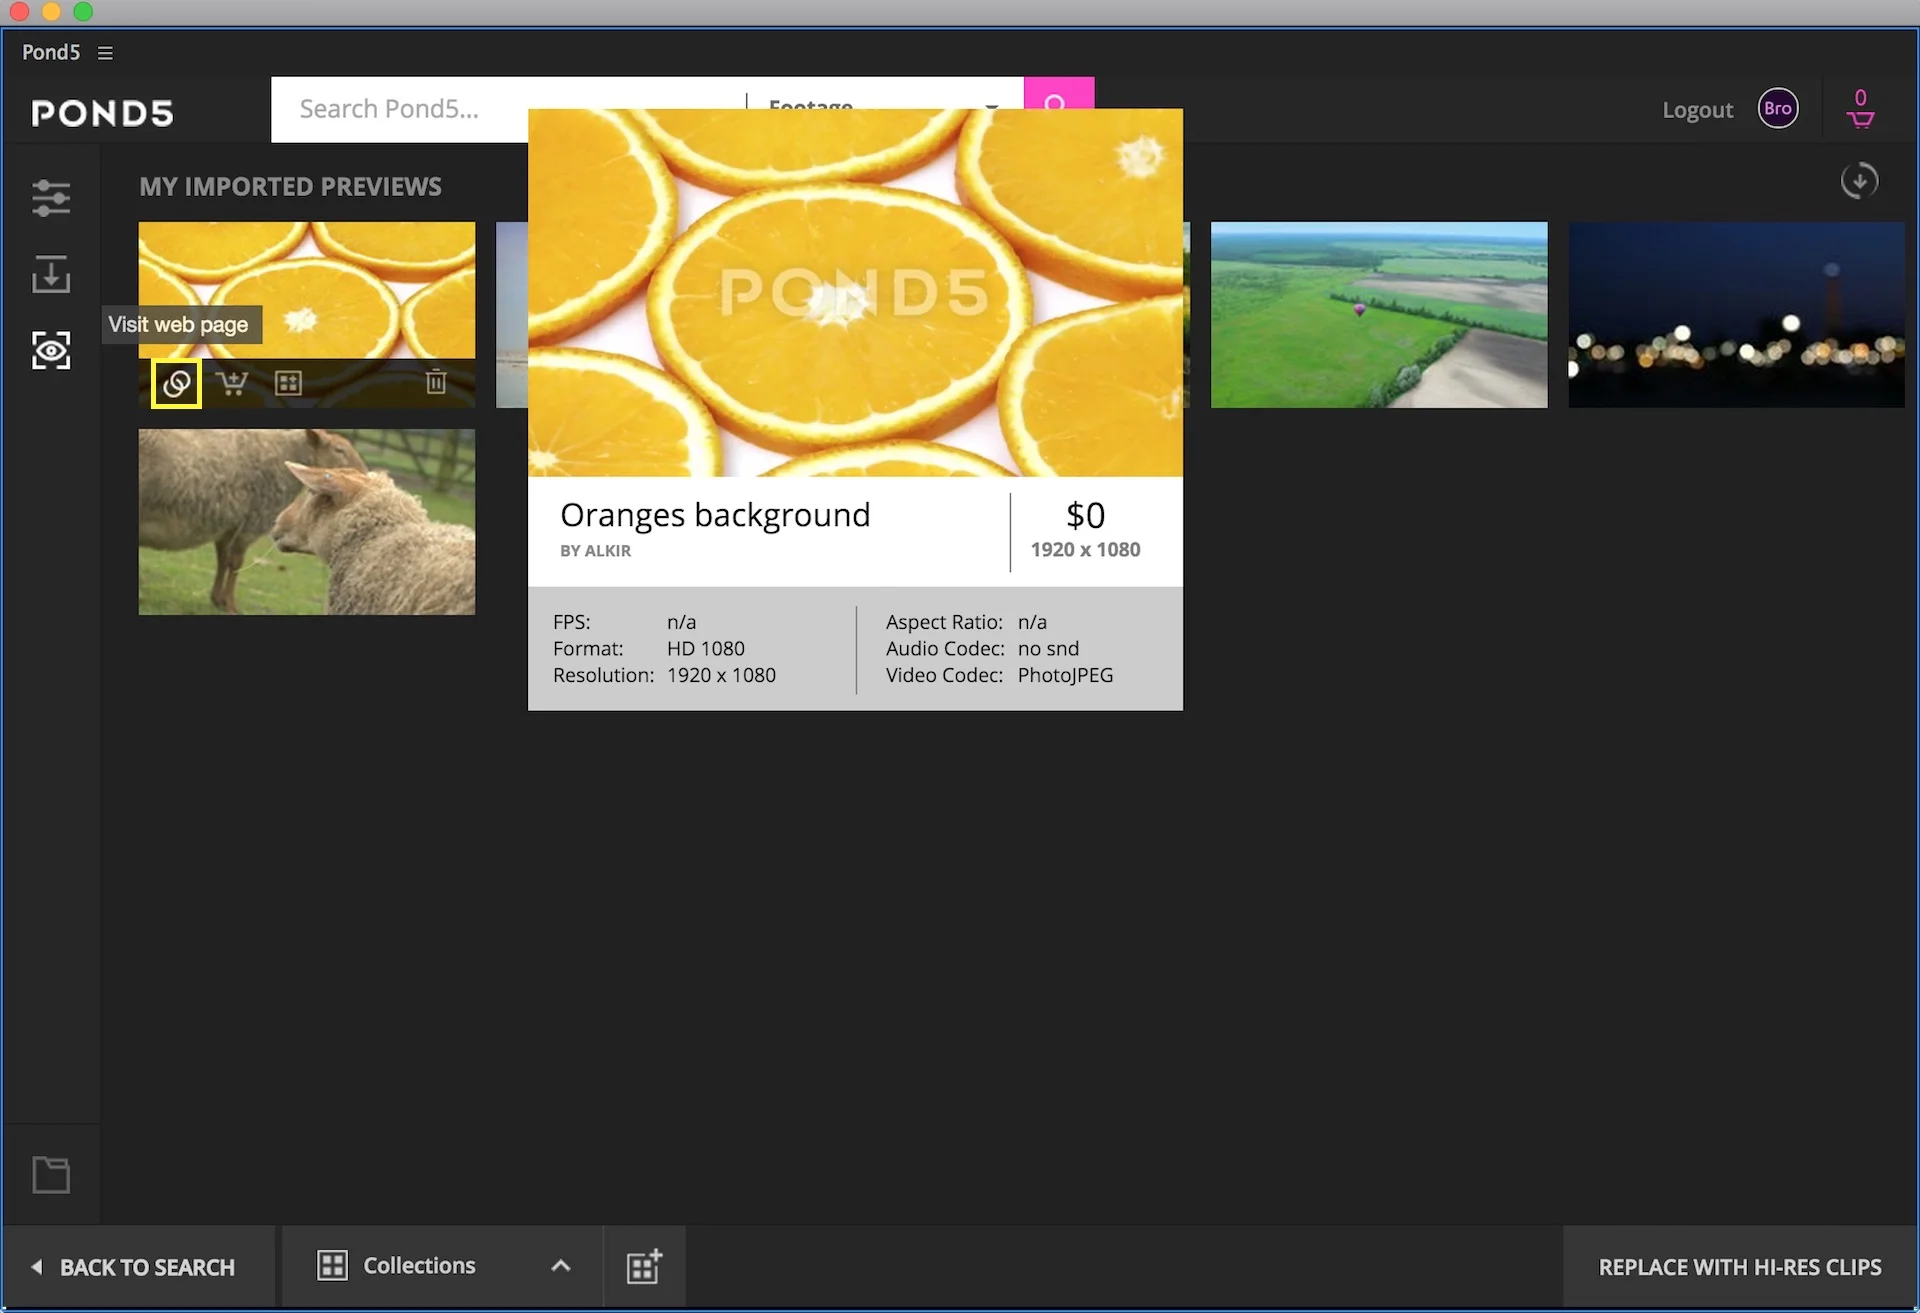
Visit Web Page
The final clip option we haven’t covered is “Visit Web Page.” Again, when you hover over clips in the Pond5 panel, it triggers an overlay menu. Click the icon that looks like double rings to view the clip’s web page, where you can find a lot more information about the clip.
This is a good time to point out that you can also save clips to your collections while browsing the Pond5 website. Clips added to collections online will automatically sync to the Pond5 panel in Premiere Pro. I found clips synced extremely fast; you can re-select the collection in the Pond5 panel to force a refresh if you don’t see recently saved clips.
Summary
As video creators, the stories we tell are only as good as the images and sounds we use, and with the Pond5 panel we now have over 8 million HD and 4K video clips, plus music and sound effects to use - right inside Premiere Pro.
Overall, the Pond5 add-on is wonderful adaptation of the Pond5 experience seamlessly integrated with Premiere Pro. The search features and “replace with hi-res” functionality are well-designed and work great. If you’re already a Pond5 fan, this Premiere Pro add-on is a no-brainer. If you’re not yet a fan, now is a good time to join the Pond5 global community!
Are you using the Pond5 panel in Premiere Pro? I would like to hear from you. Is there any feature you would like to see added to the panel? Drop me a line in the comments below!